

This article describes how Apache APISIX integrates with Keycloak (OpenID Connect Provider) to secure your APIs.
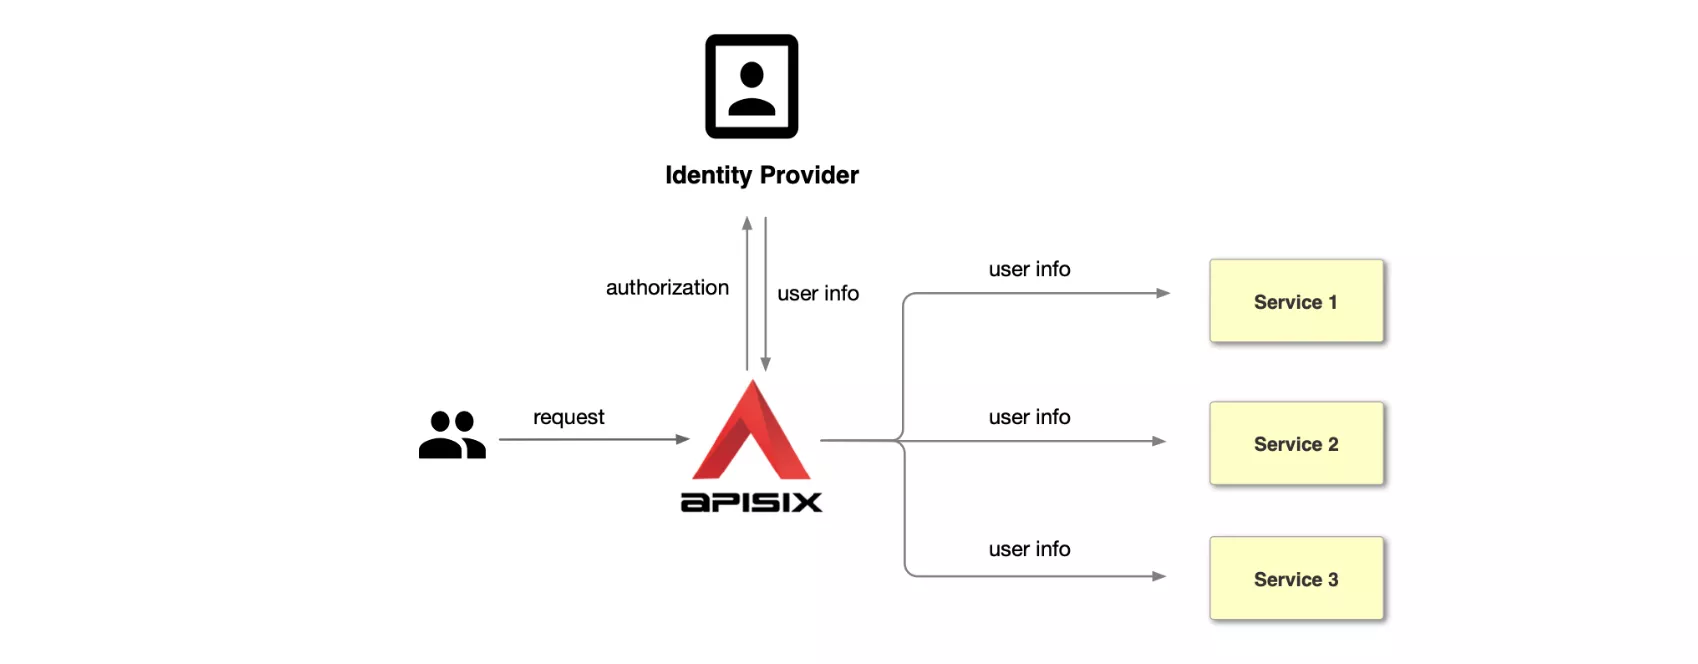
OpenID Connect referred to as OIDC, is an authentication protocol based on the OAuth 2.0. It allows the client to obtain user information from the identity provider (IdP), e.g., Keycloak, Ory, Okta, Auth0, etc. The open-source API Gateway Apache APISIX supports using the openid-connect plugin to integrate with the above identity Providers. It will redirect all unauthenticated clients to IdP's login page. After the successful authentication, APISIX will pass the user information to the upstream service.

Keycloak is an open-source identity and access management. It adds authentication to applications and secures services with minimum effort. Also, it provides user federation, strong authentication, user management, fine-grained authorization, and more. In this post, we will take Keycloak as an example, and let's see how to integrate it with APISIX to protect your services.
Workflow
The following diagram shows the OpenID-Connect protocol interaction flow.
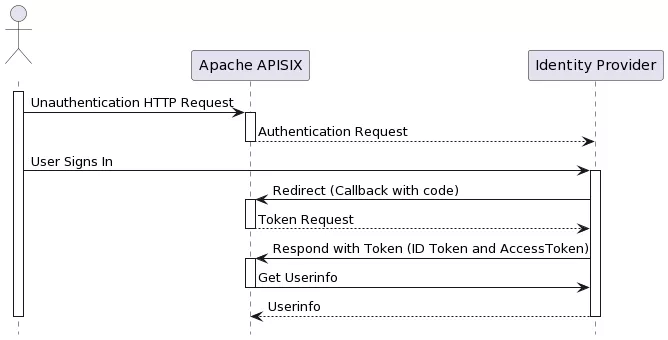

In the Redirect stage, Identity Provider redirects users to a pre-configured Redirect URL, similar to http://127.0.0.1:9080/callback. But note: it is a non-existent API that only captures the relevant request and processes the code for Token exchange using OIDC logic. Please do not use this address as a condition to trigger OIDC plugin redirection; otherwise, it will return the error request to the redirect_uri path, but there's no session state found.
Terminology
- Bearer Only: Keycloak supports username/password or AccessTokens for authentication, and if the bearer_only option is enabled, only AccessTokens are allowed for authentication, which is applicable for access authentication between services.
- Realm: A realm in Keycloak is the equivalent of a tenant; realms are isolated from one another and can only manage and authenticate their users.
- Scope: Client scope is a way to limit the roles that get declared inside an access token. For example, when a client requests that a user be authenticated, the access token they receive back will only contain the role mappings you’ve explicitly specified for the client’s scope. Client scope allows you to limit each individual access token's permissions rather than giving the client access to all of the user’s permissions.
- User: Users are entities that can log in to Keycloak. Please think about "Sign in with Google."
- Client: Clients are services (entities) that want to use Keycloak to protect themselves.
Prerequisites
- This guide will use CentOS 7 and Docker v20.10.17 to install and start Keycloak.
- If you deploy Keycloak and APISIX on your server, please change the following IP (127.0.0.1) to your server's IP.
Apache APISIX
Please refer to https://apisix.apache.org/docs/apisix/getting-started to install and start APISIX. After that, you could visit http://127.0.0.1:9080/ to access the APISIX instance.
Keycloak
Execute the following command to run Keycloak on the server, and we pass admin as Keycloak administrator's username and password.
docker run -d -p 8080:8080 -e KEYCLOAK_ADMIN=admin -e KEYCLOAK_ADMIN_PASSWORD=admin quay.io/keycloak/keycloak:18.0.2 start-dev

61a6d6cbfb1f9fe81a6a0dfde7e8ba15e58bf99303697c4e73ab249d005a6678
Check if the Keycloak container starts successfully.
docker ps -a

CONTAINER ID   IMAGE                              COMMAND                  CREATED          STATUS          PORTS                                                 NAMES
61a6d6cbfb1f   quay.io/keycloak/keycloak:18.0.2   "/opt/keycloak/bin/k…"   11 seconds ago   Up 10 seconds   0.0.0.0:8080->8080/tcp, :::8080->8080/tcp, 8443/tcp   heuristic_dirac
Once started, Keycloak will be available on port 8080.
Create a Realm
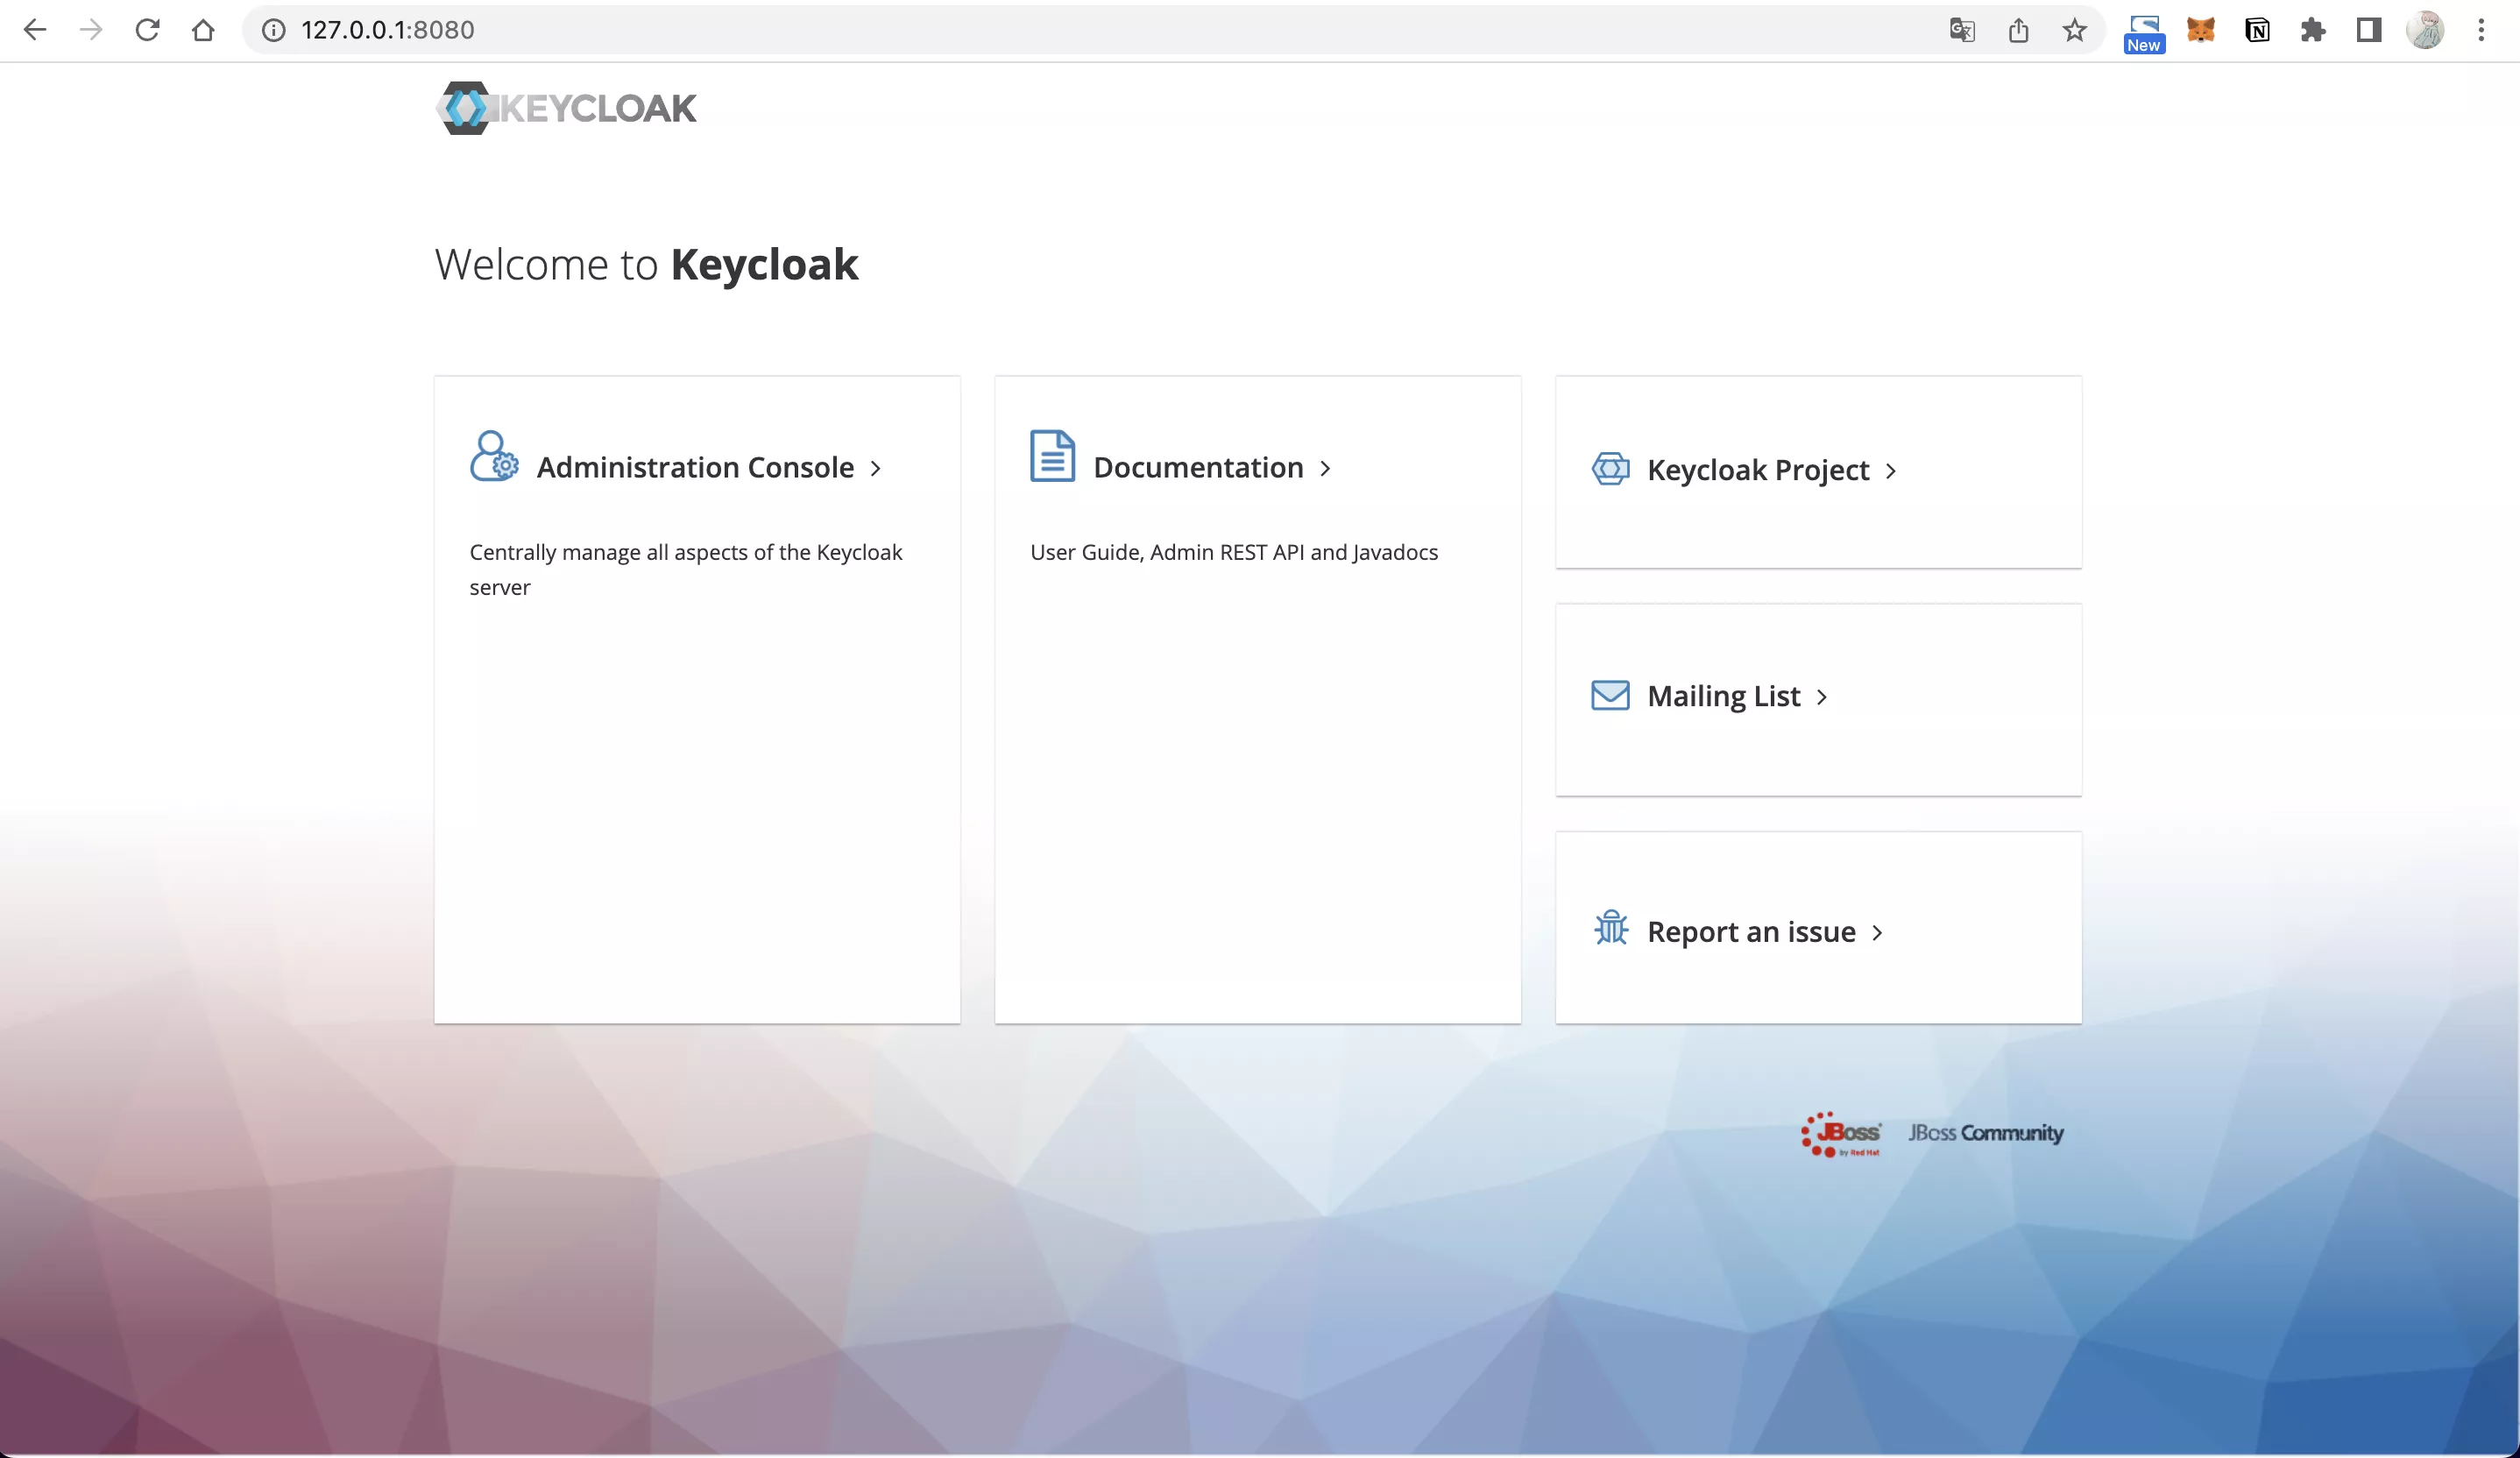
Visit http://127.0.0.1:8080/ in your browser to display the following screen, indicating that Keycloak has started successfully.

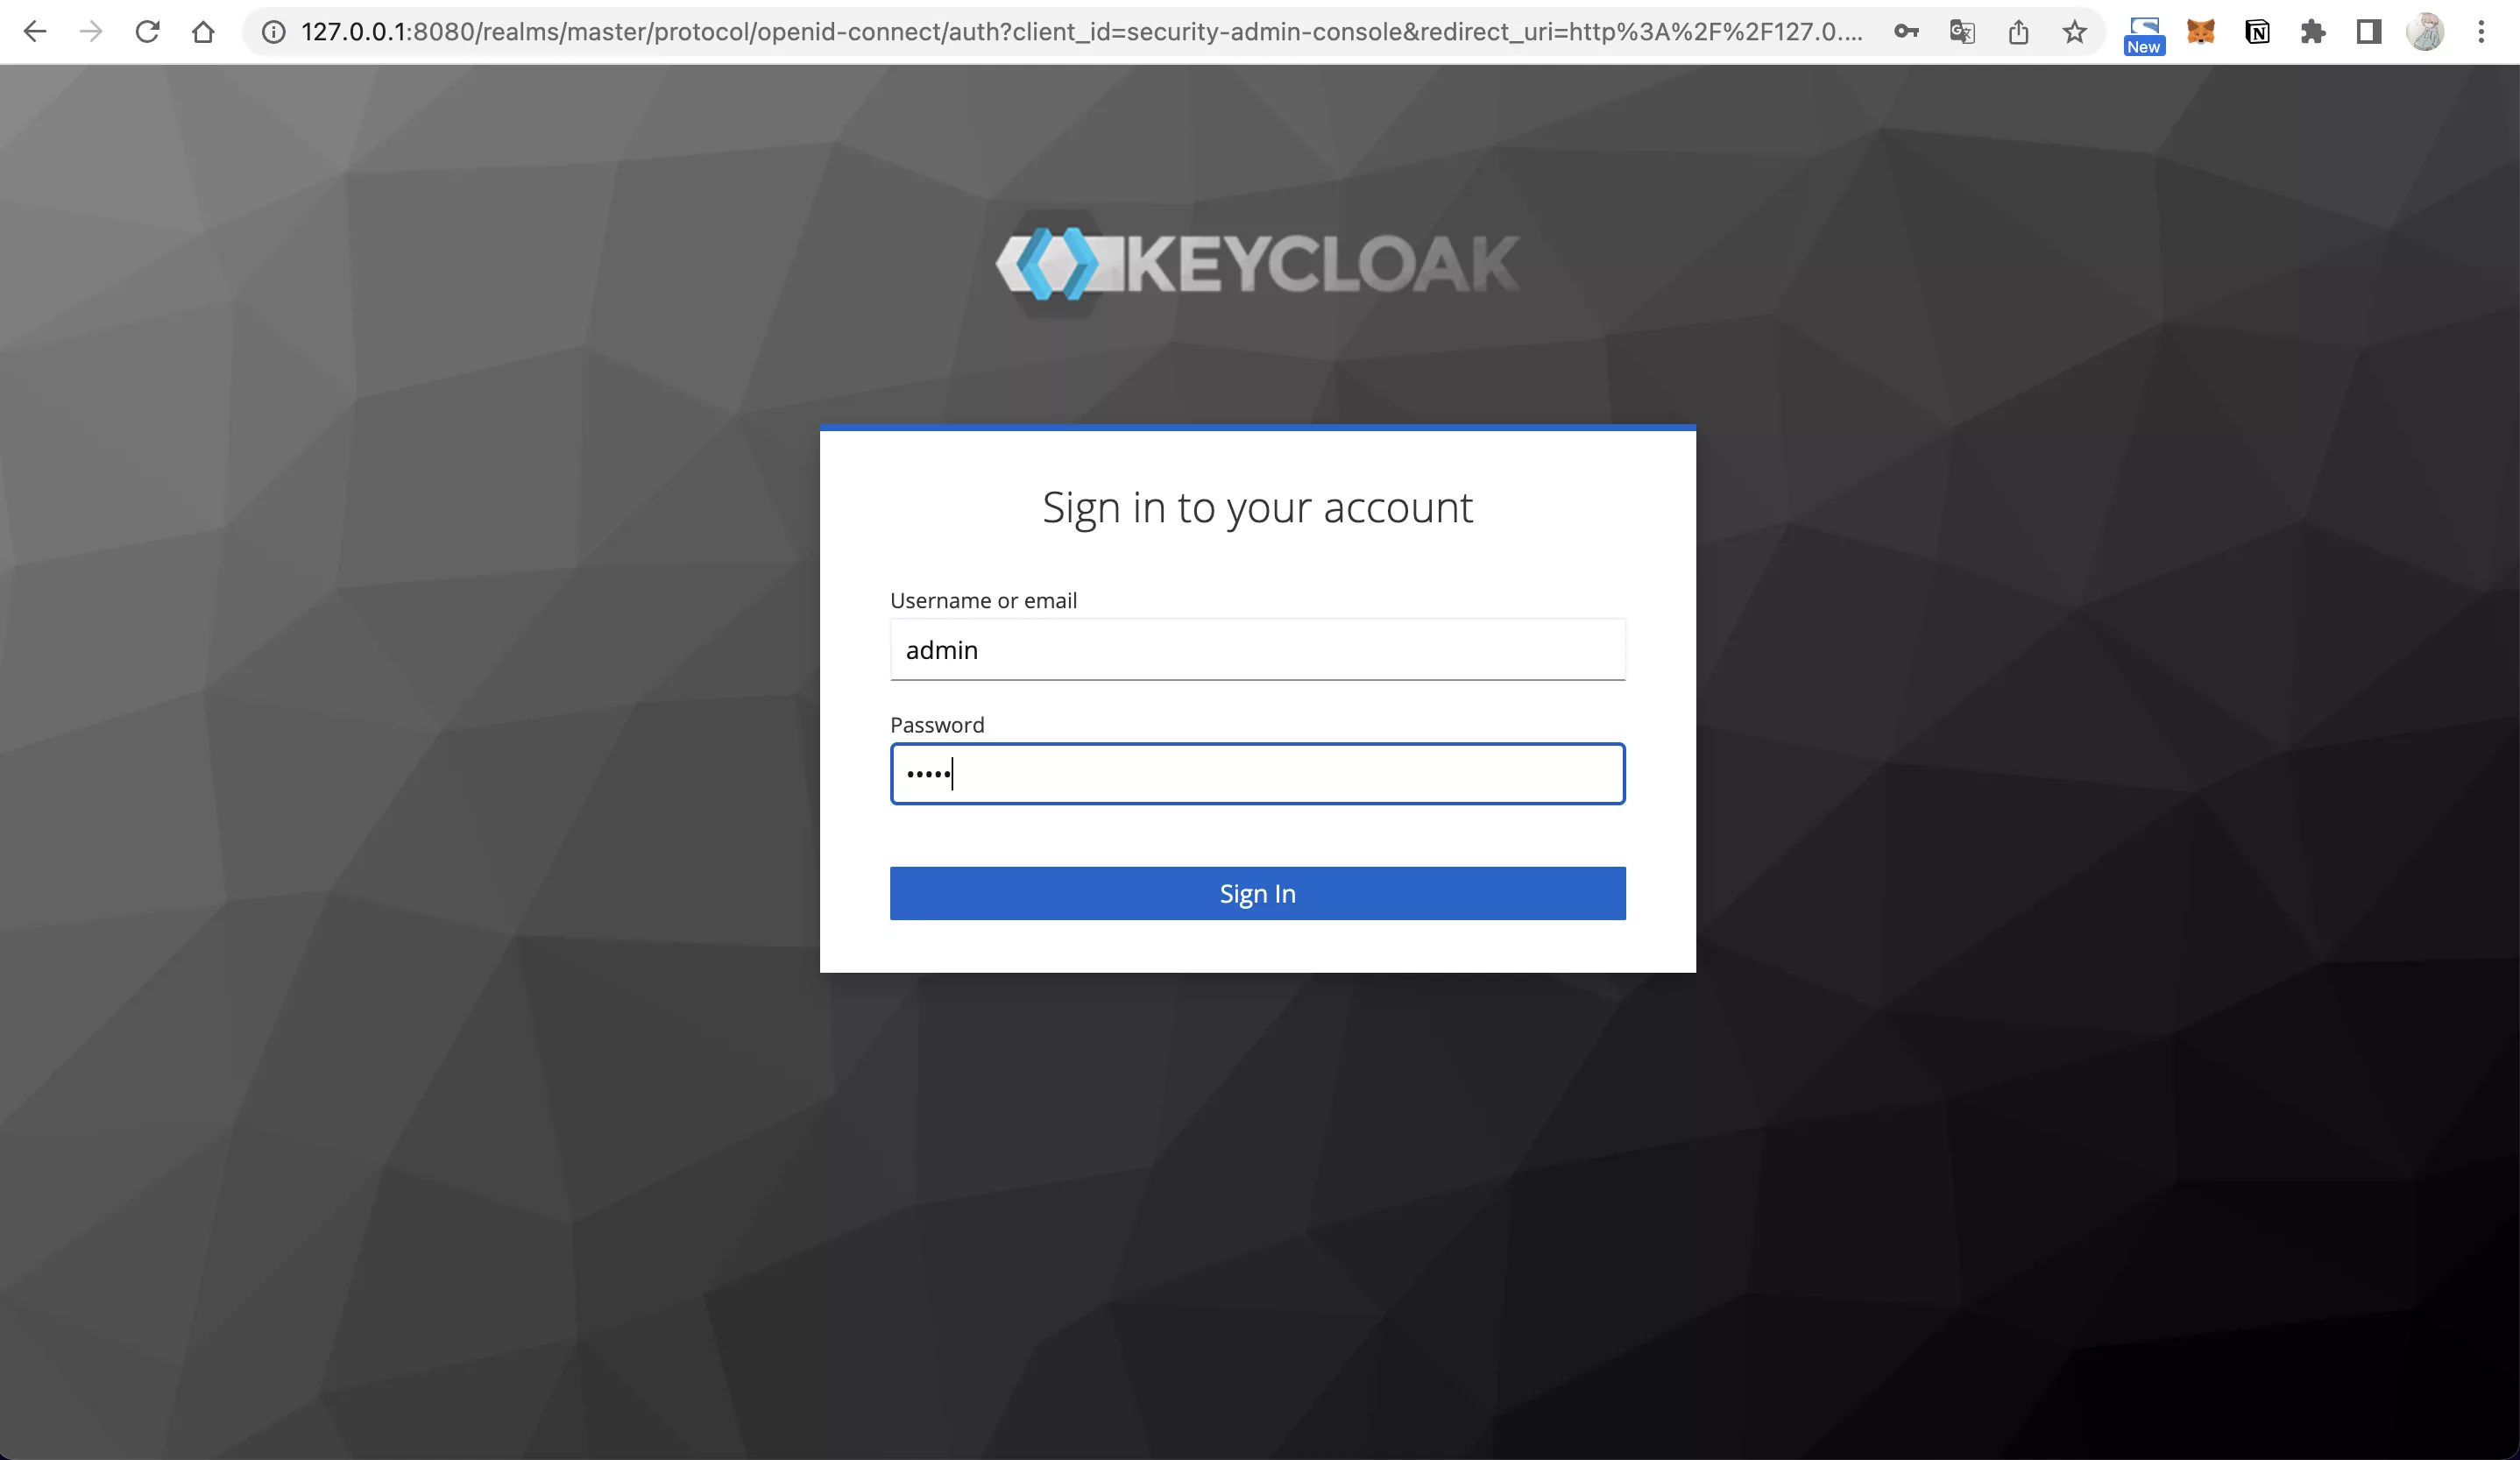
Go to the Administrator Console and log in using admin as the username and password.
When you log in for the first time after installation, a Realm named master will be created in the system by default, but it's dedicated to managing Keycloak, and we should not use it for our applications, so we need to create a new one.
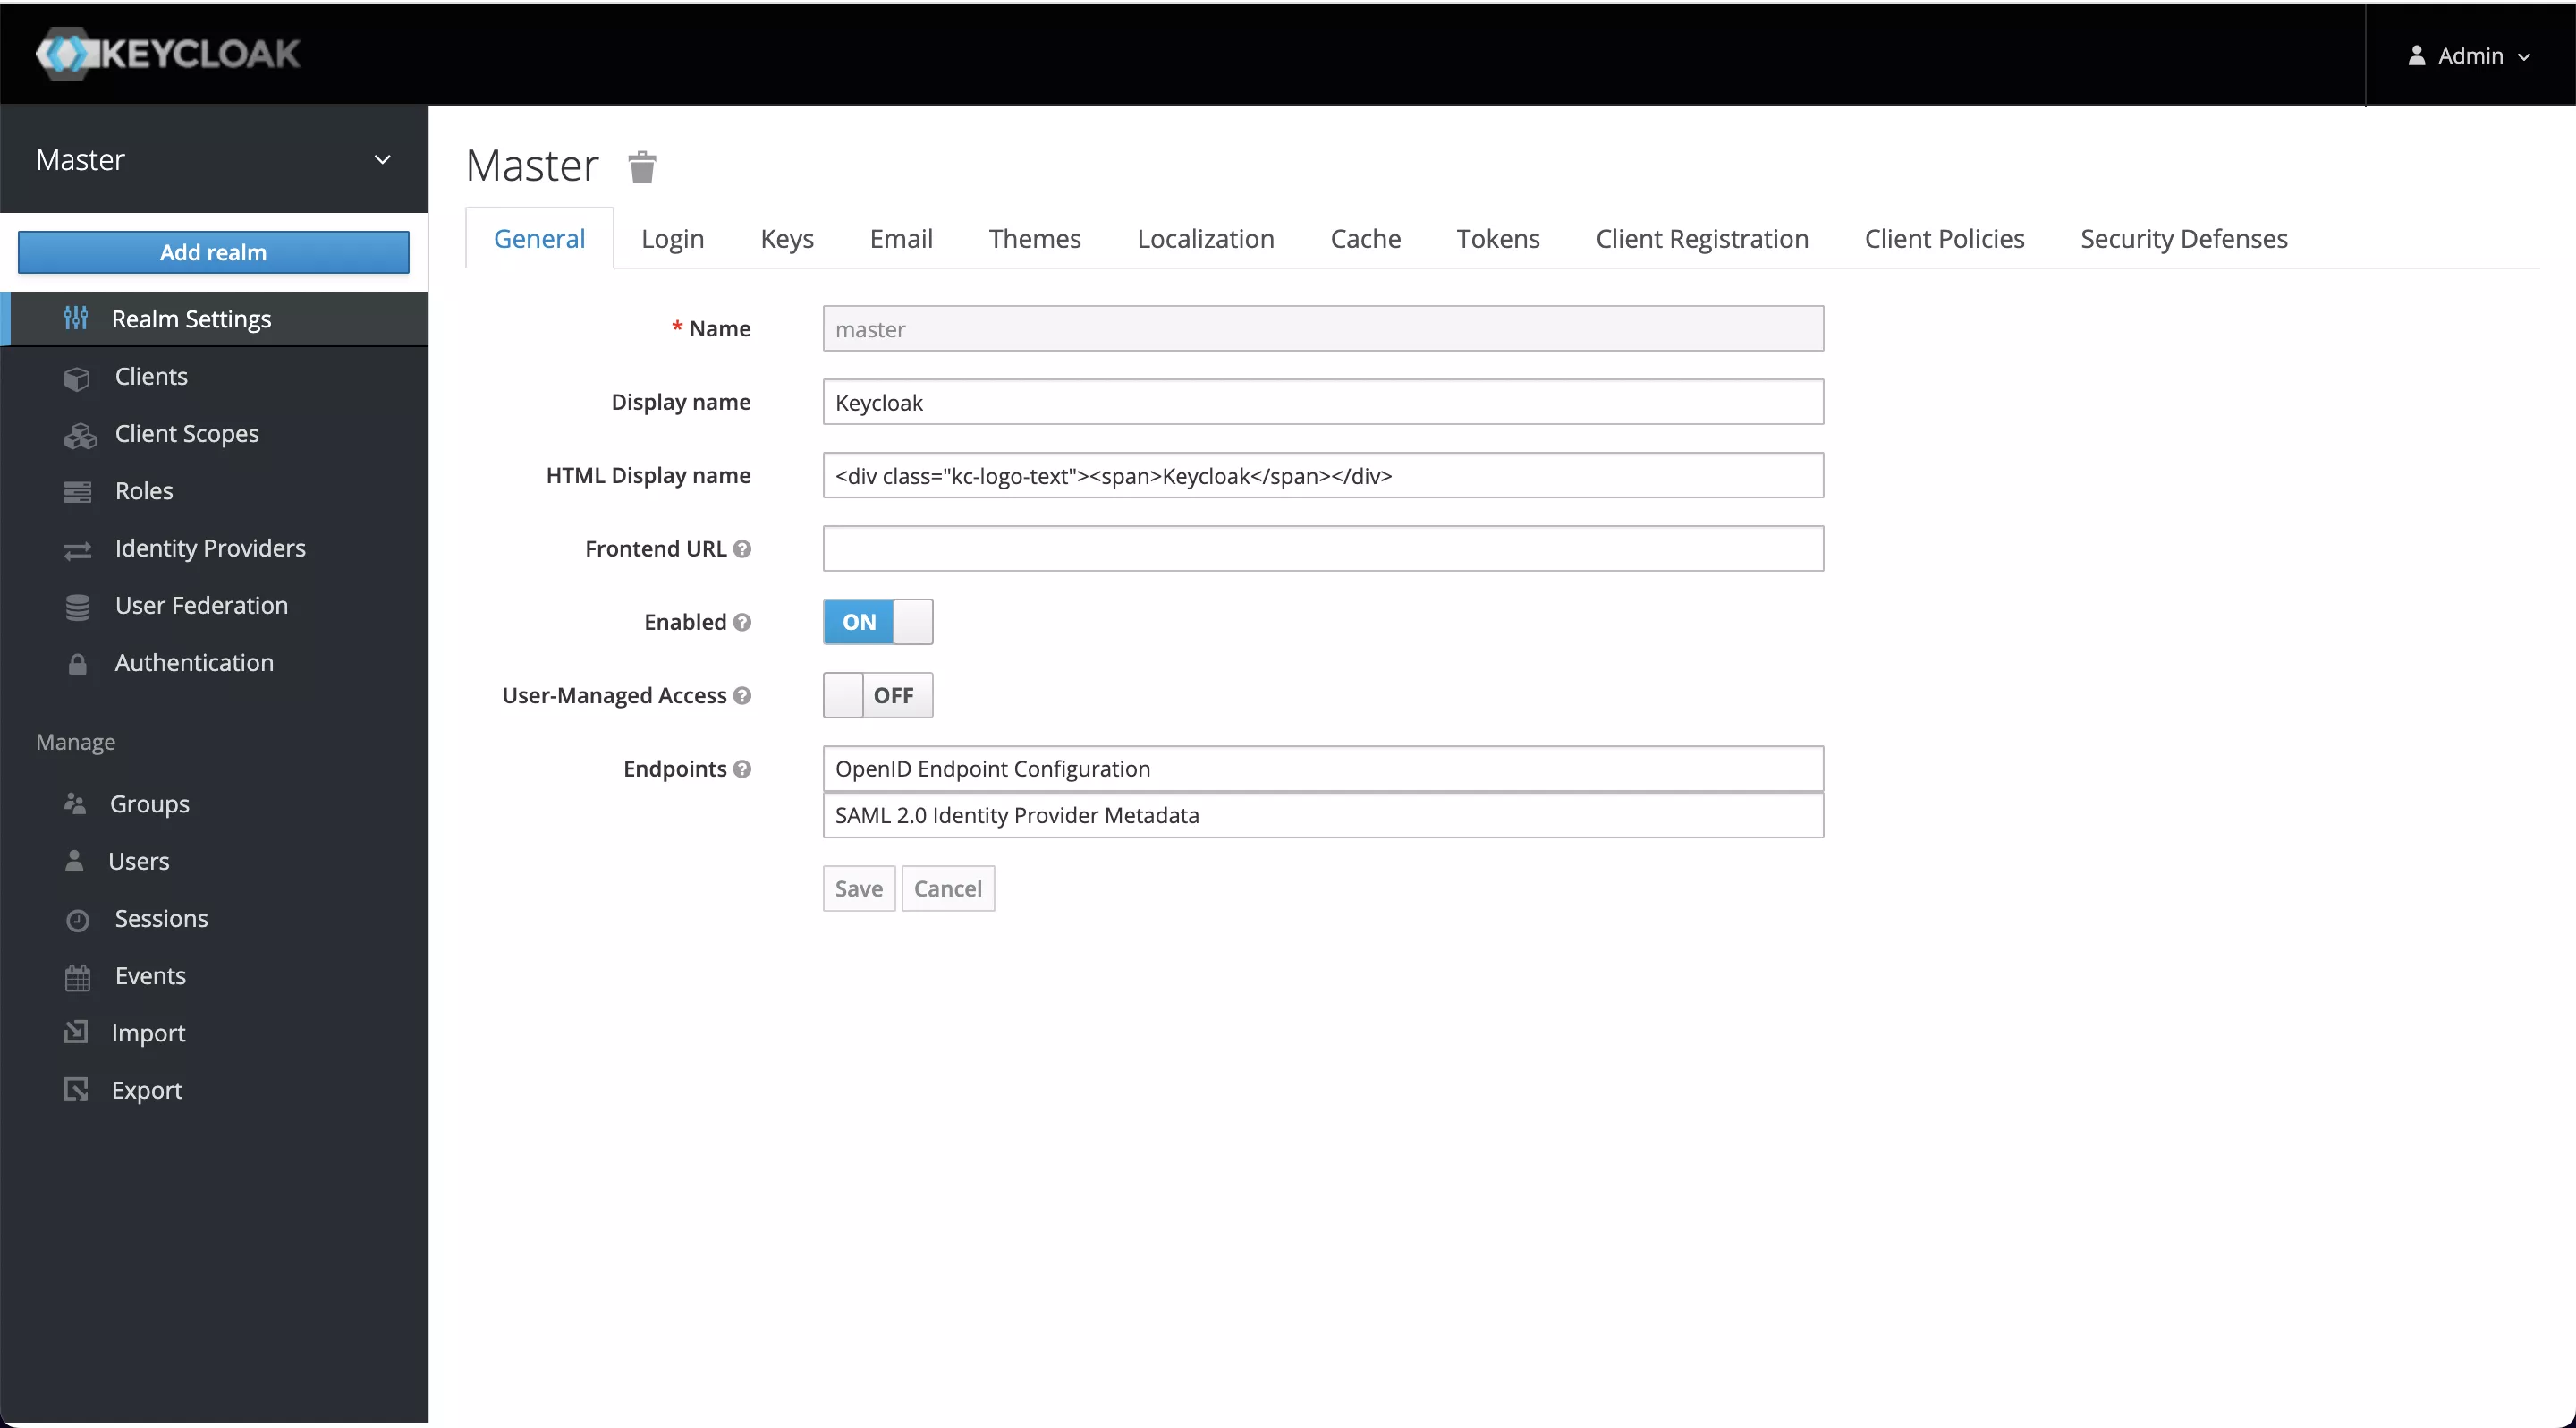

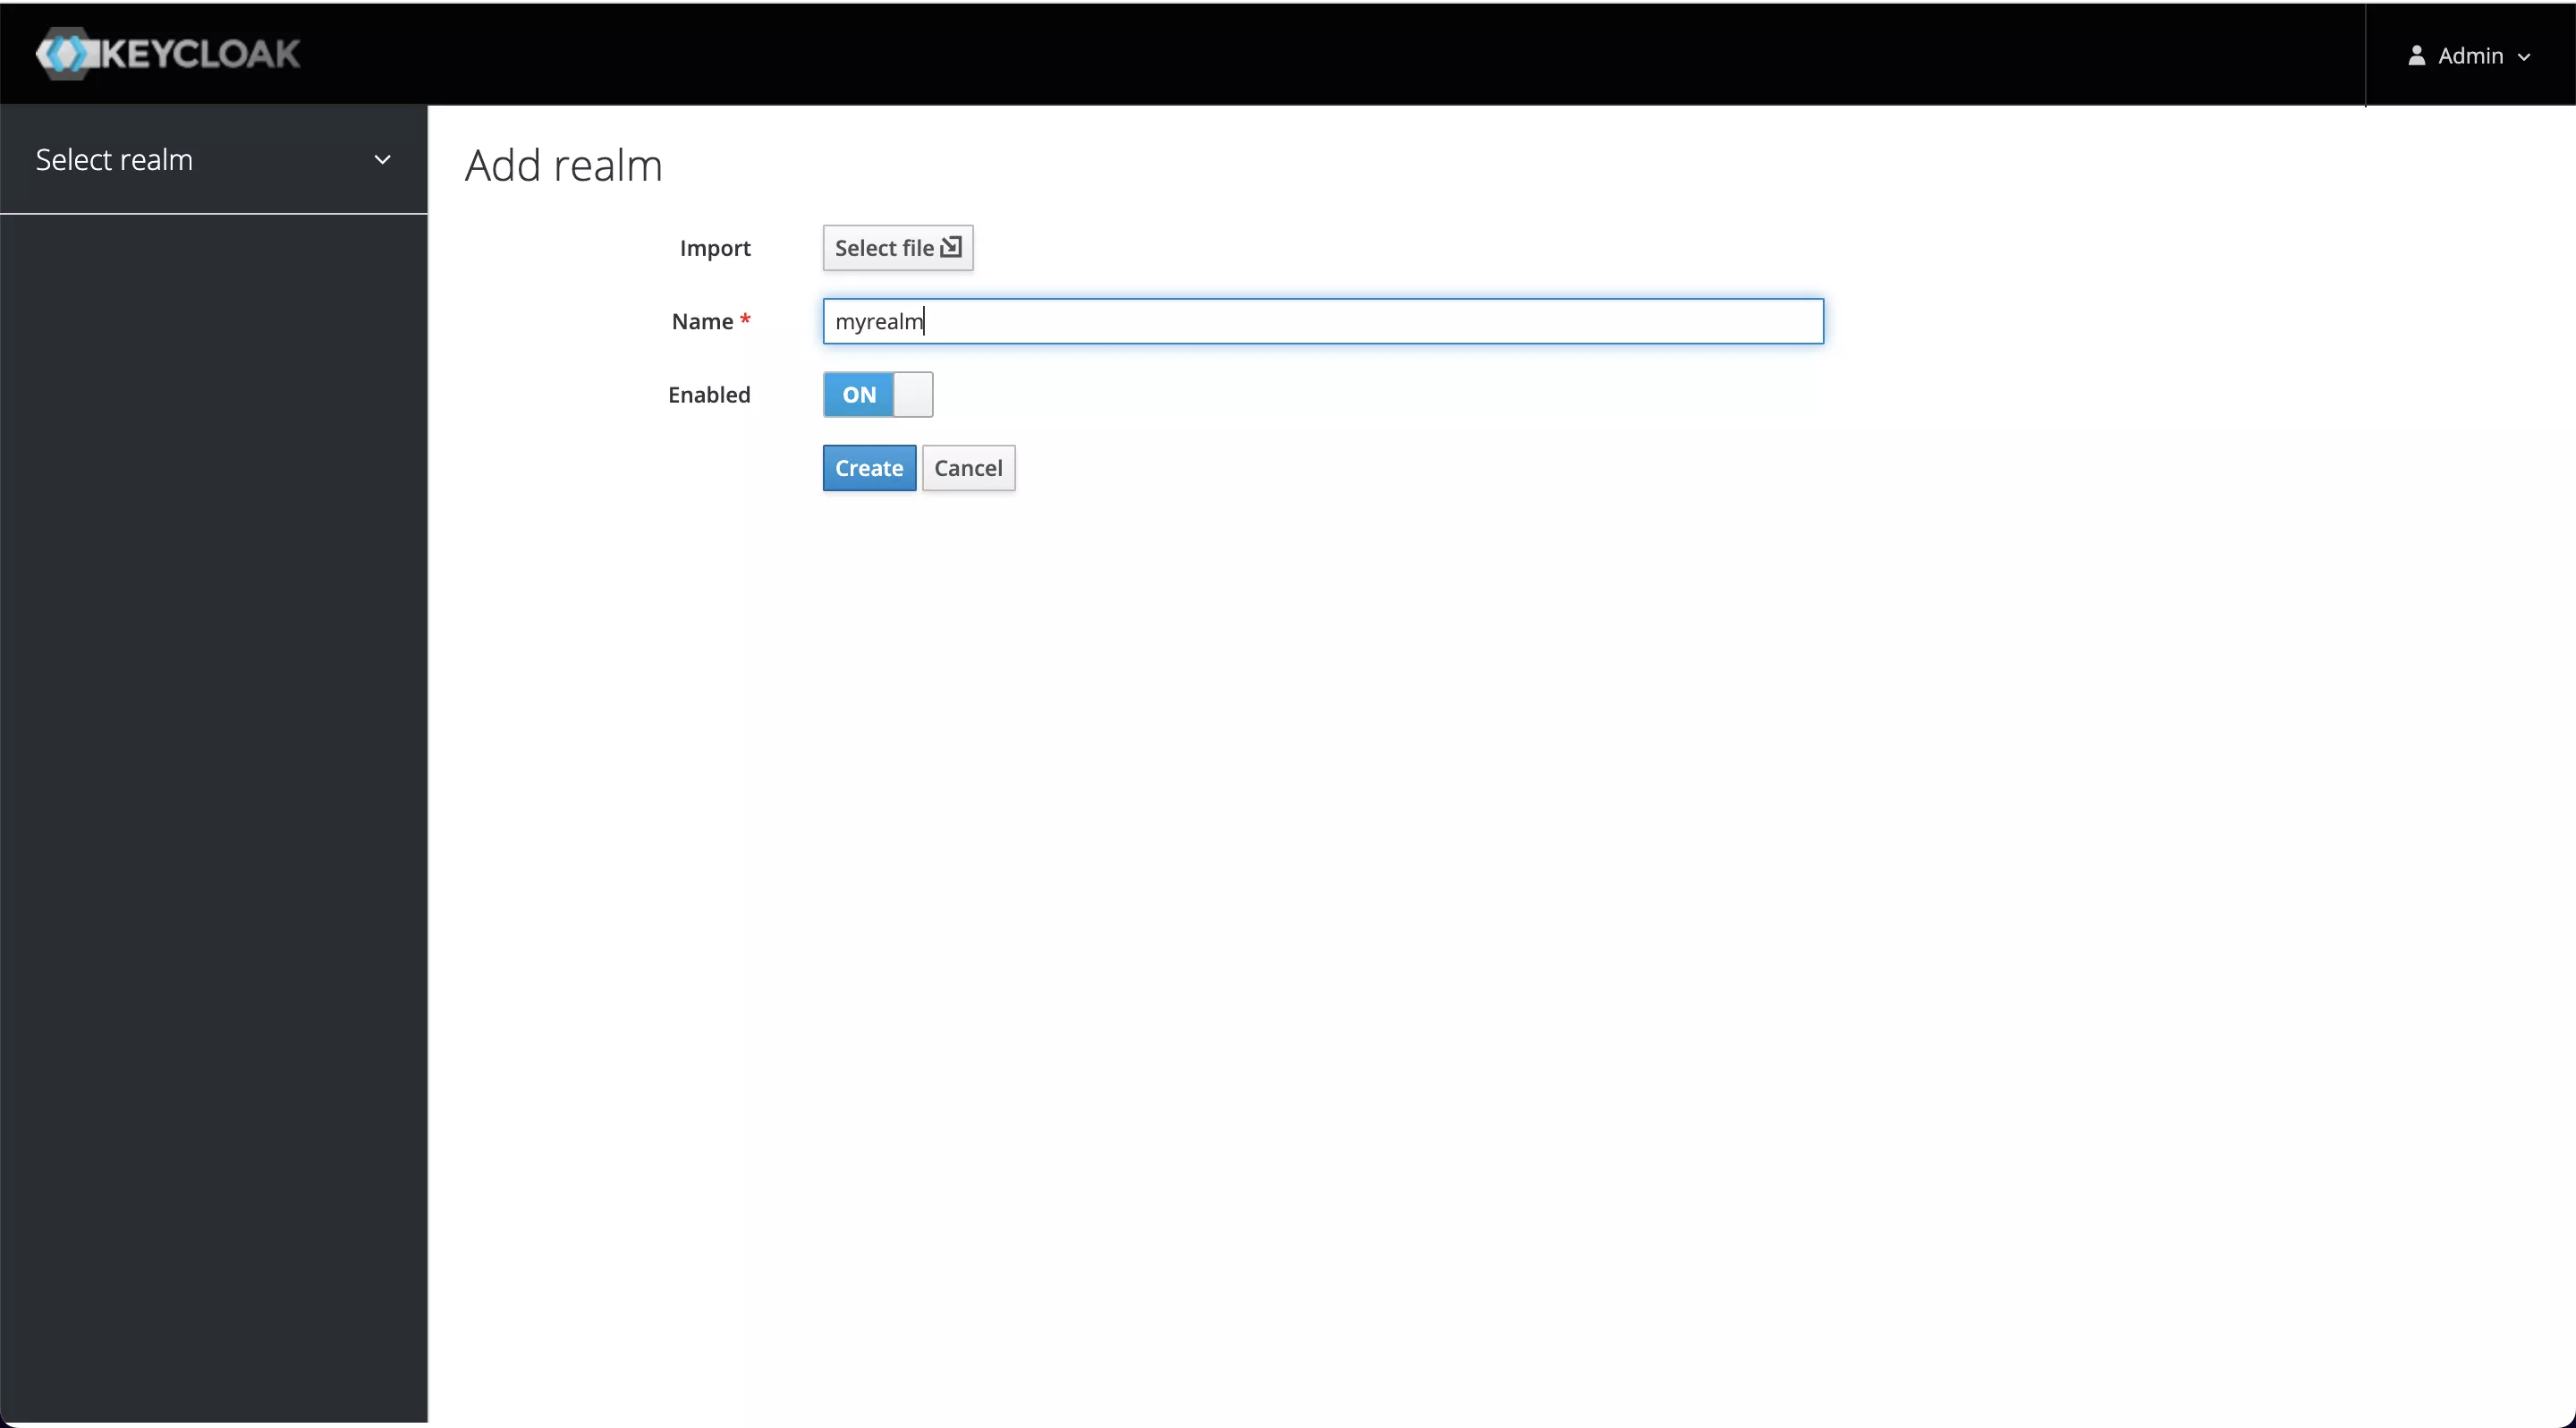
Click Add realm when you mouse over the Master on the left and enter myrealm as the Realm's name to create it.

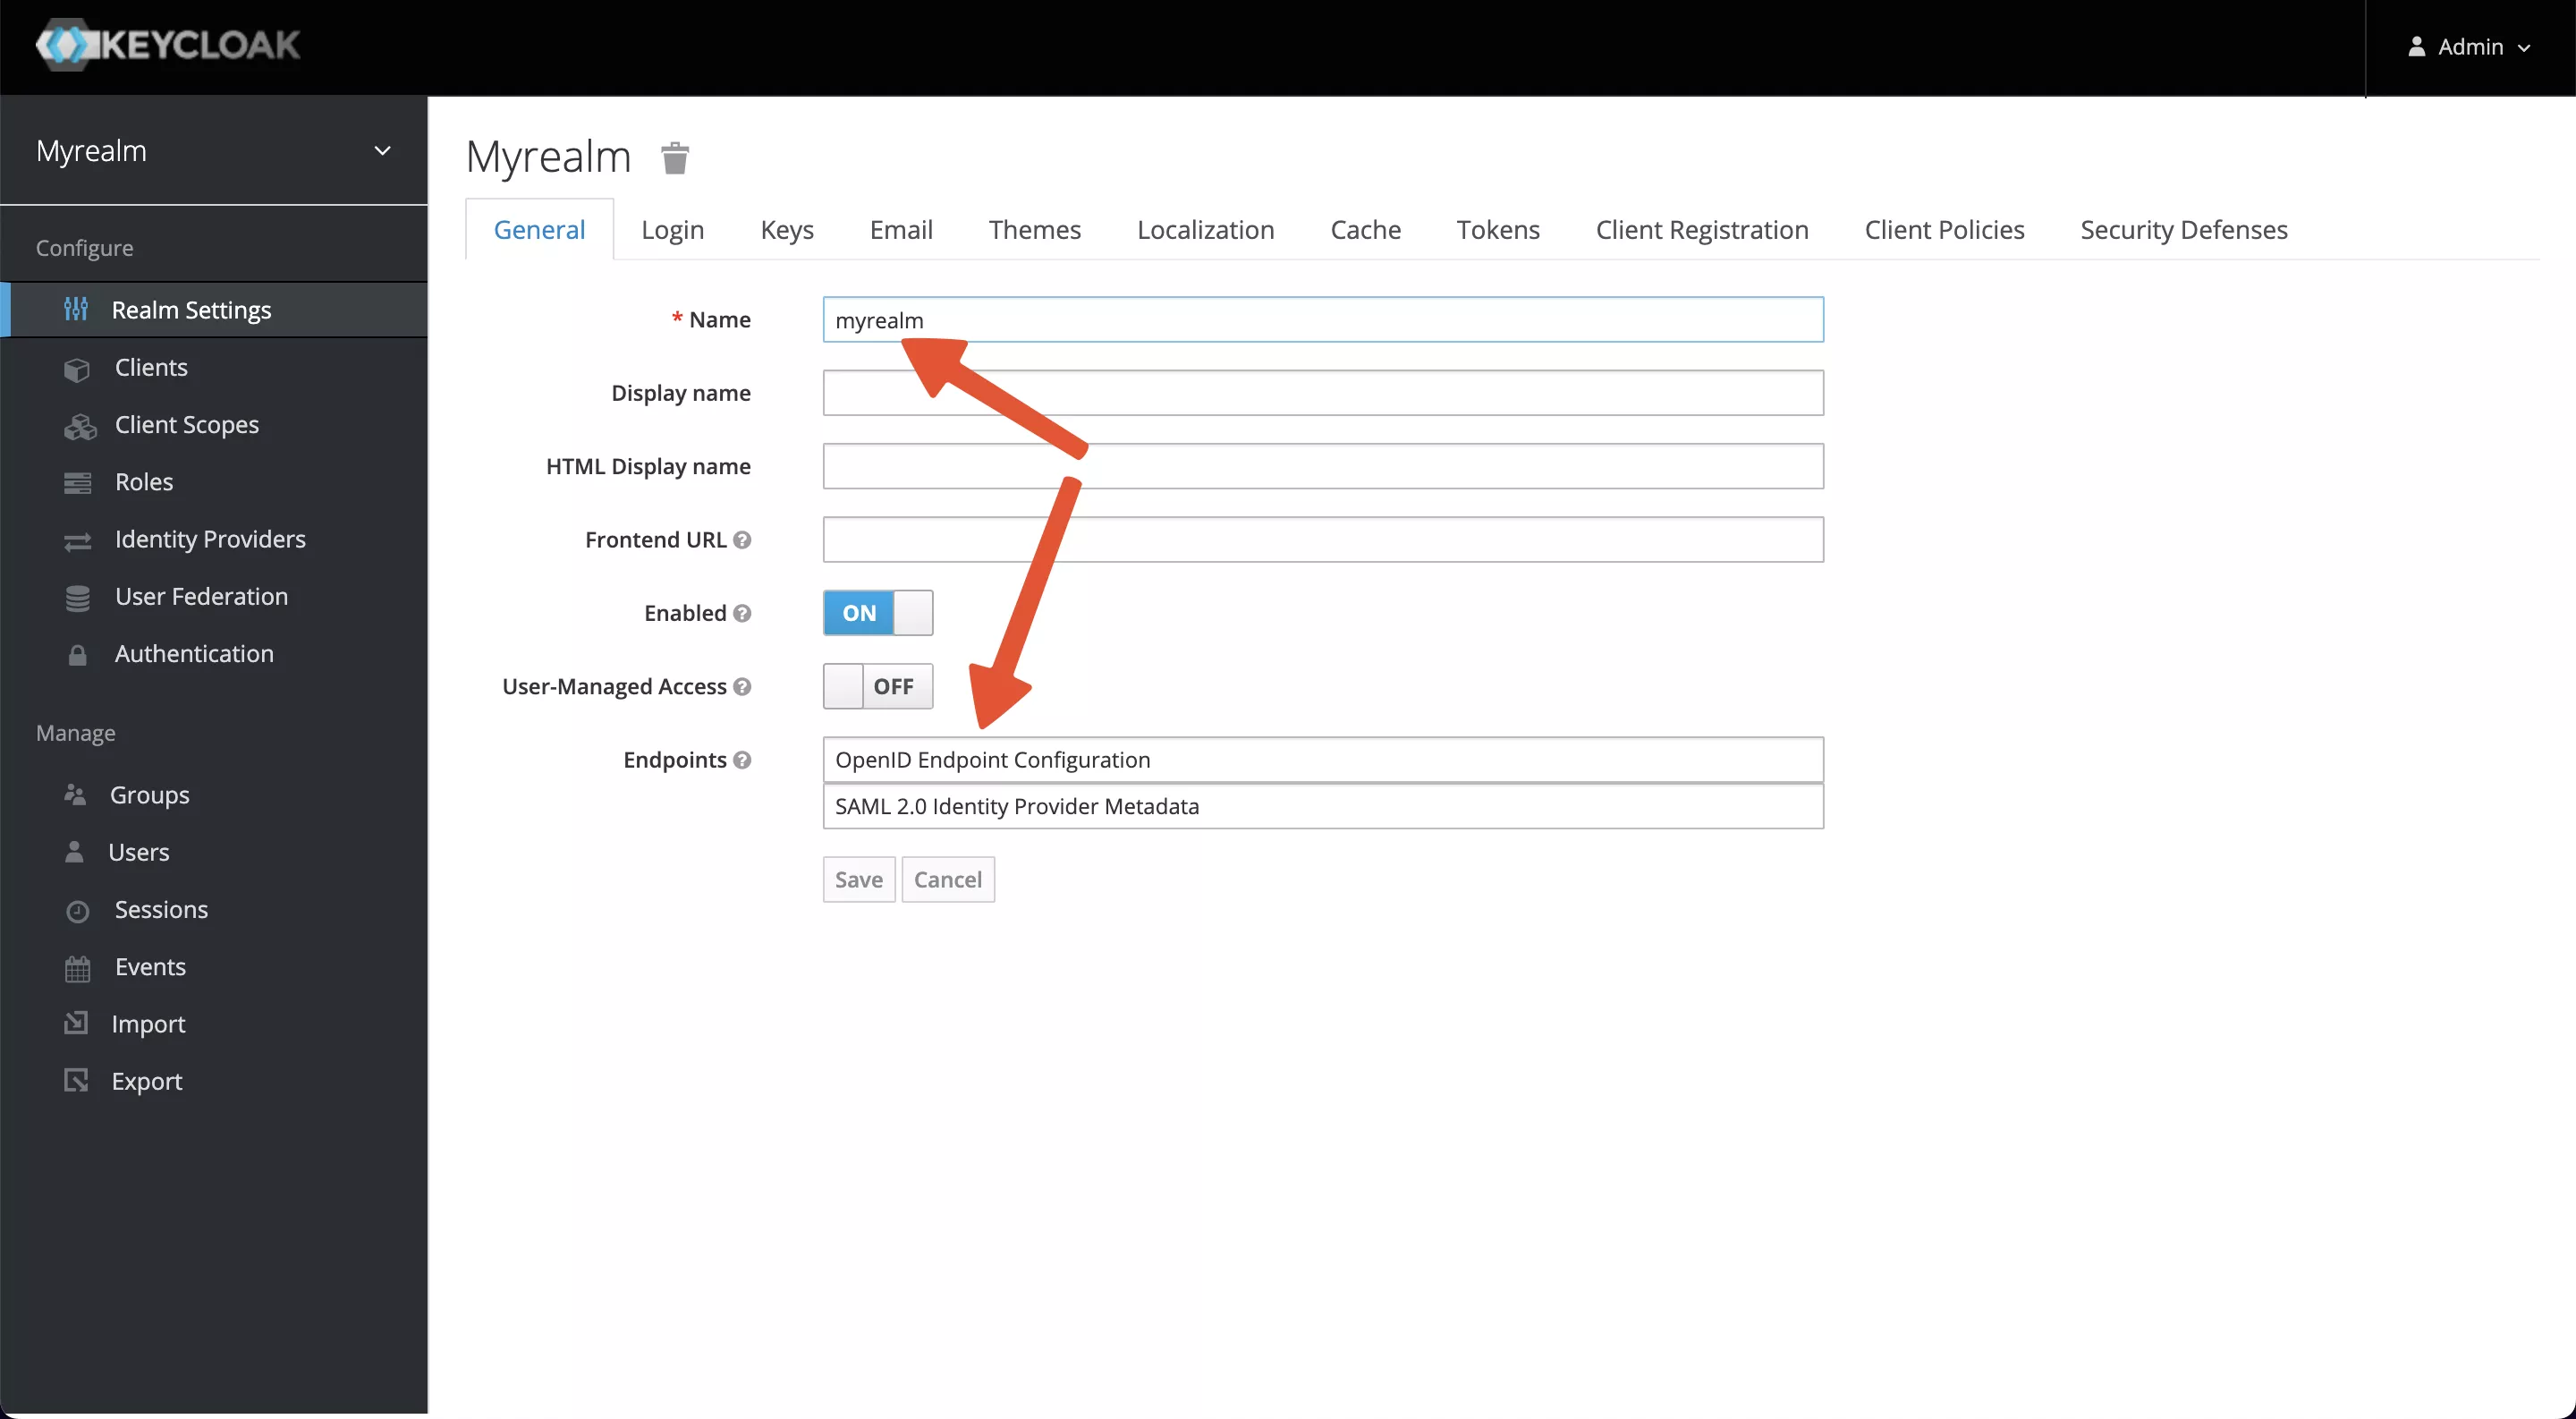
After successful creation, you will see that you have switched to myrealm and at the bottom, you have Endpoints -> OpenID Endpoint Configuration at http://127.0.0.1:8080/realms/myrealm/.well-known/openid-configuration.
This endpoint contains a Discovery file, which will be used later as the address of each node that OIDC needs to use.

Create a User
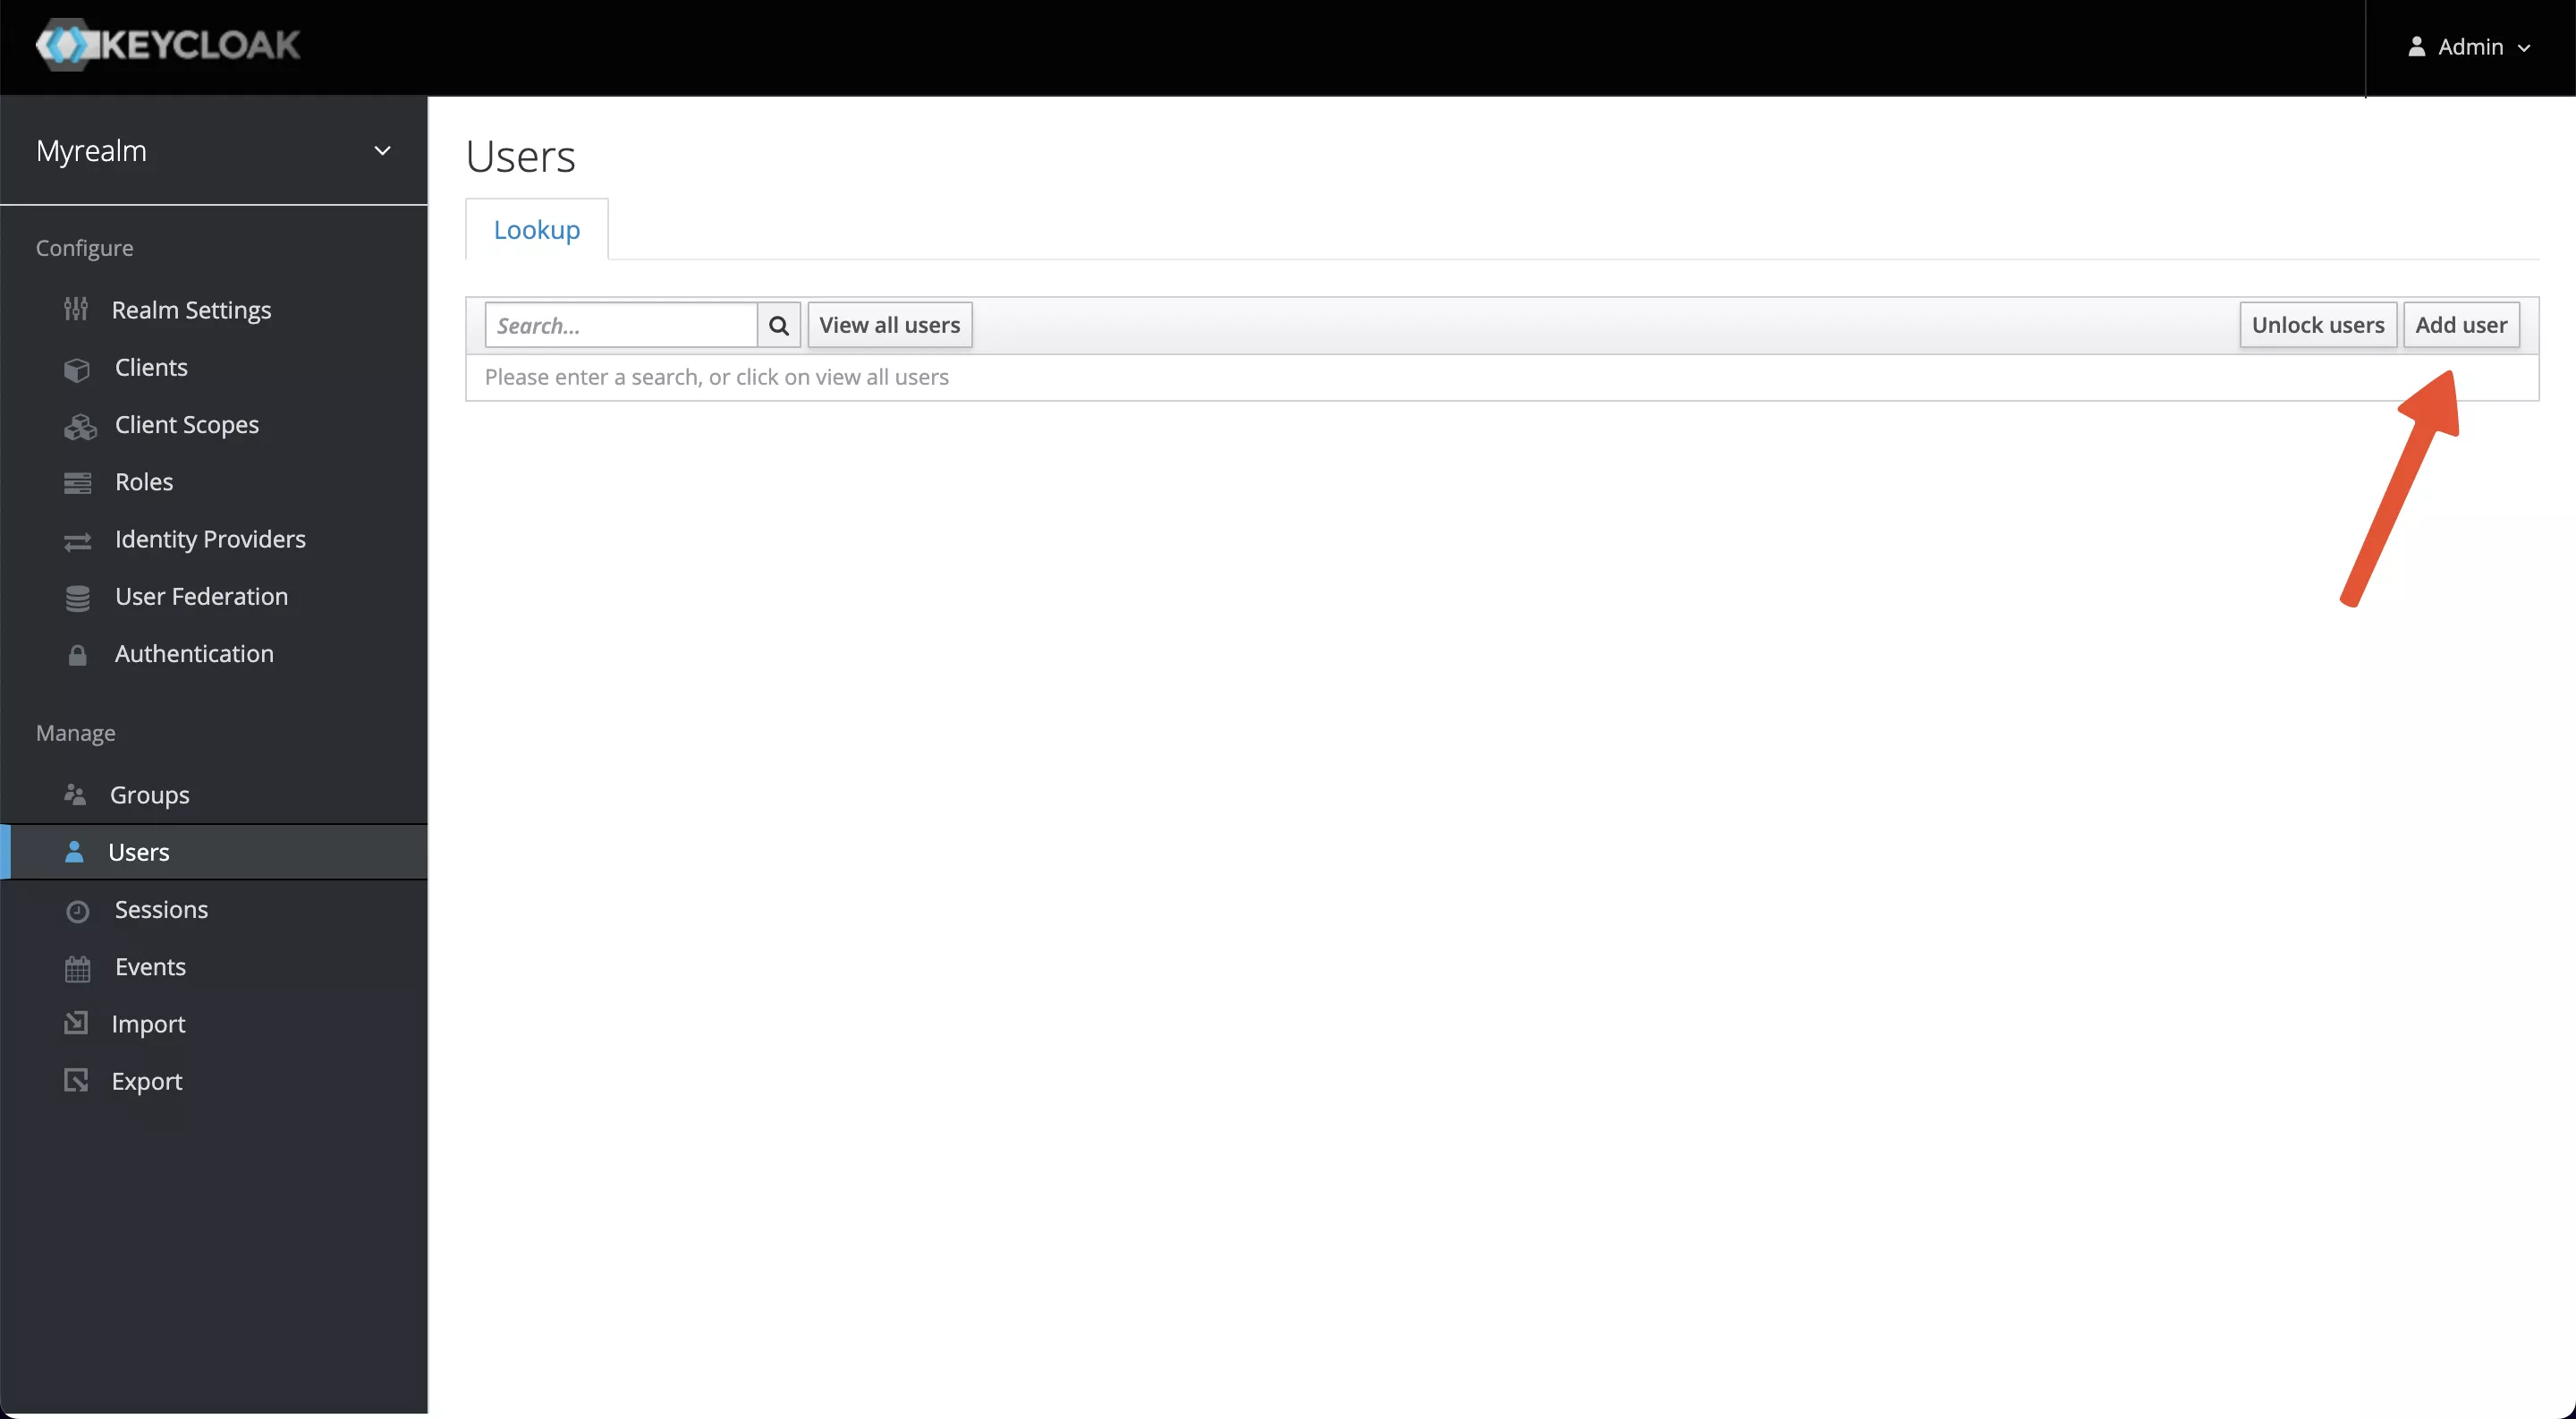
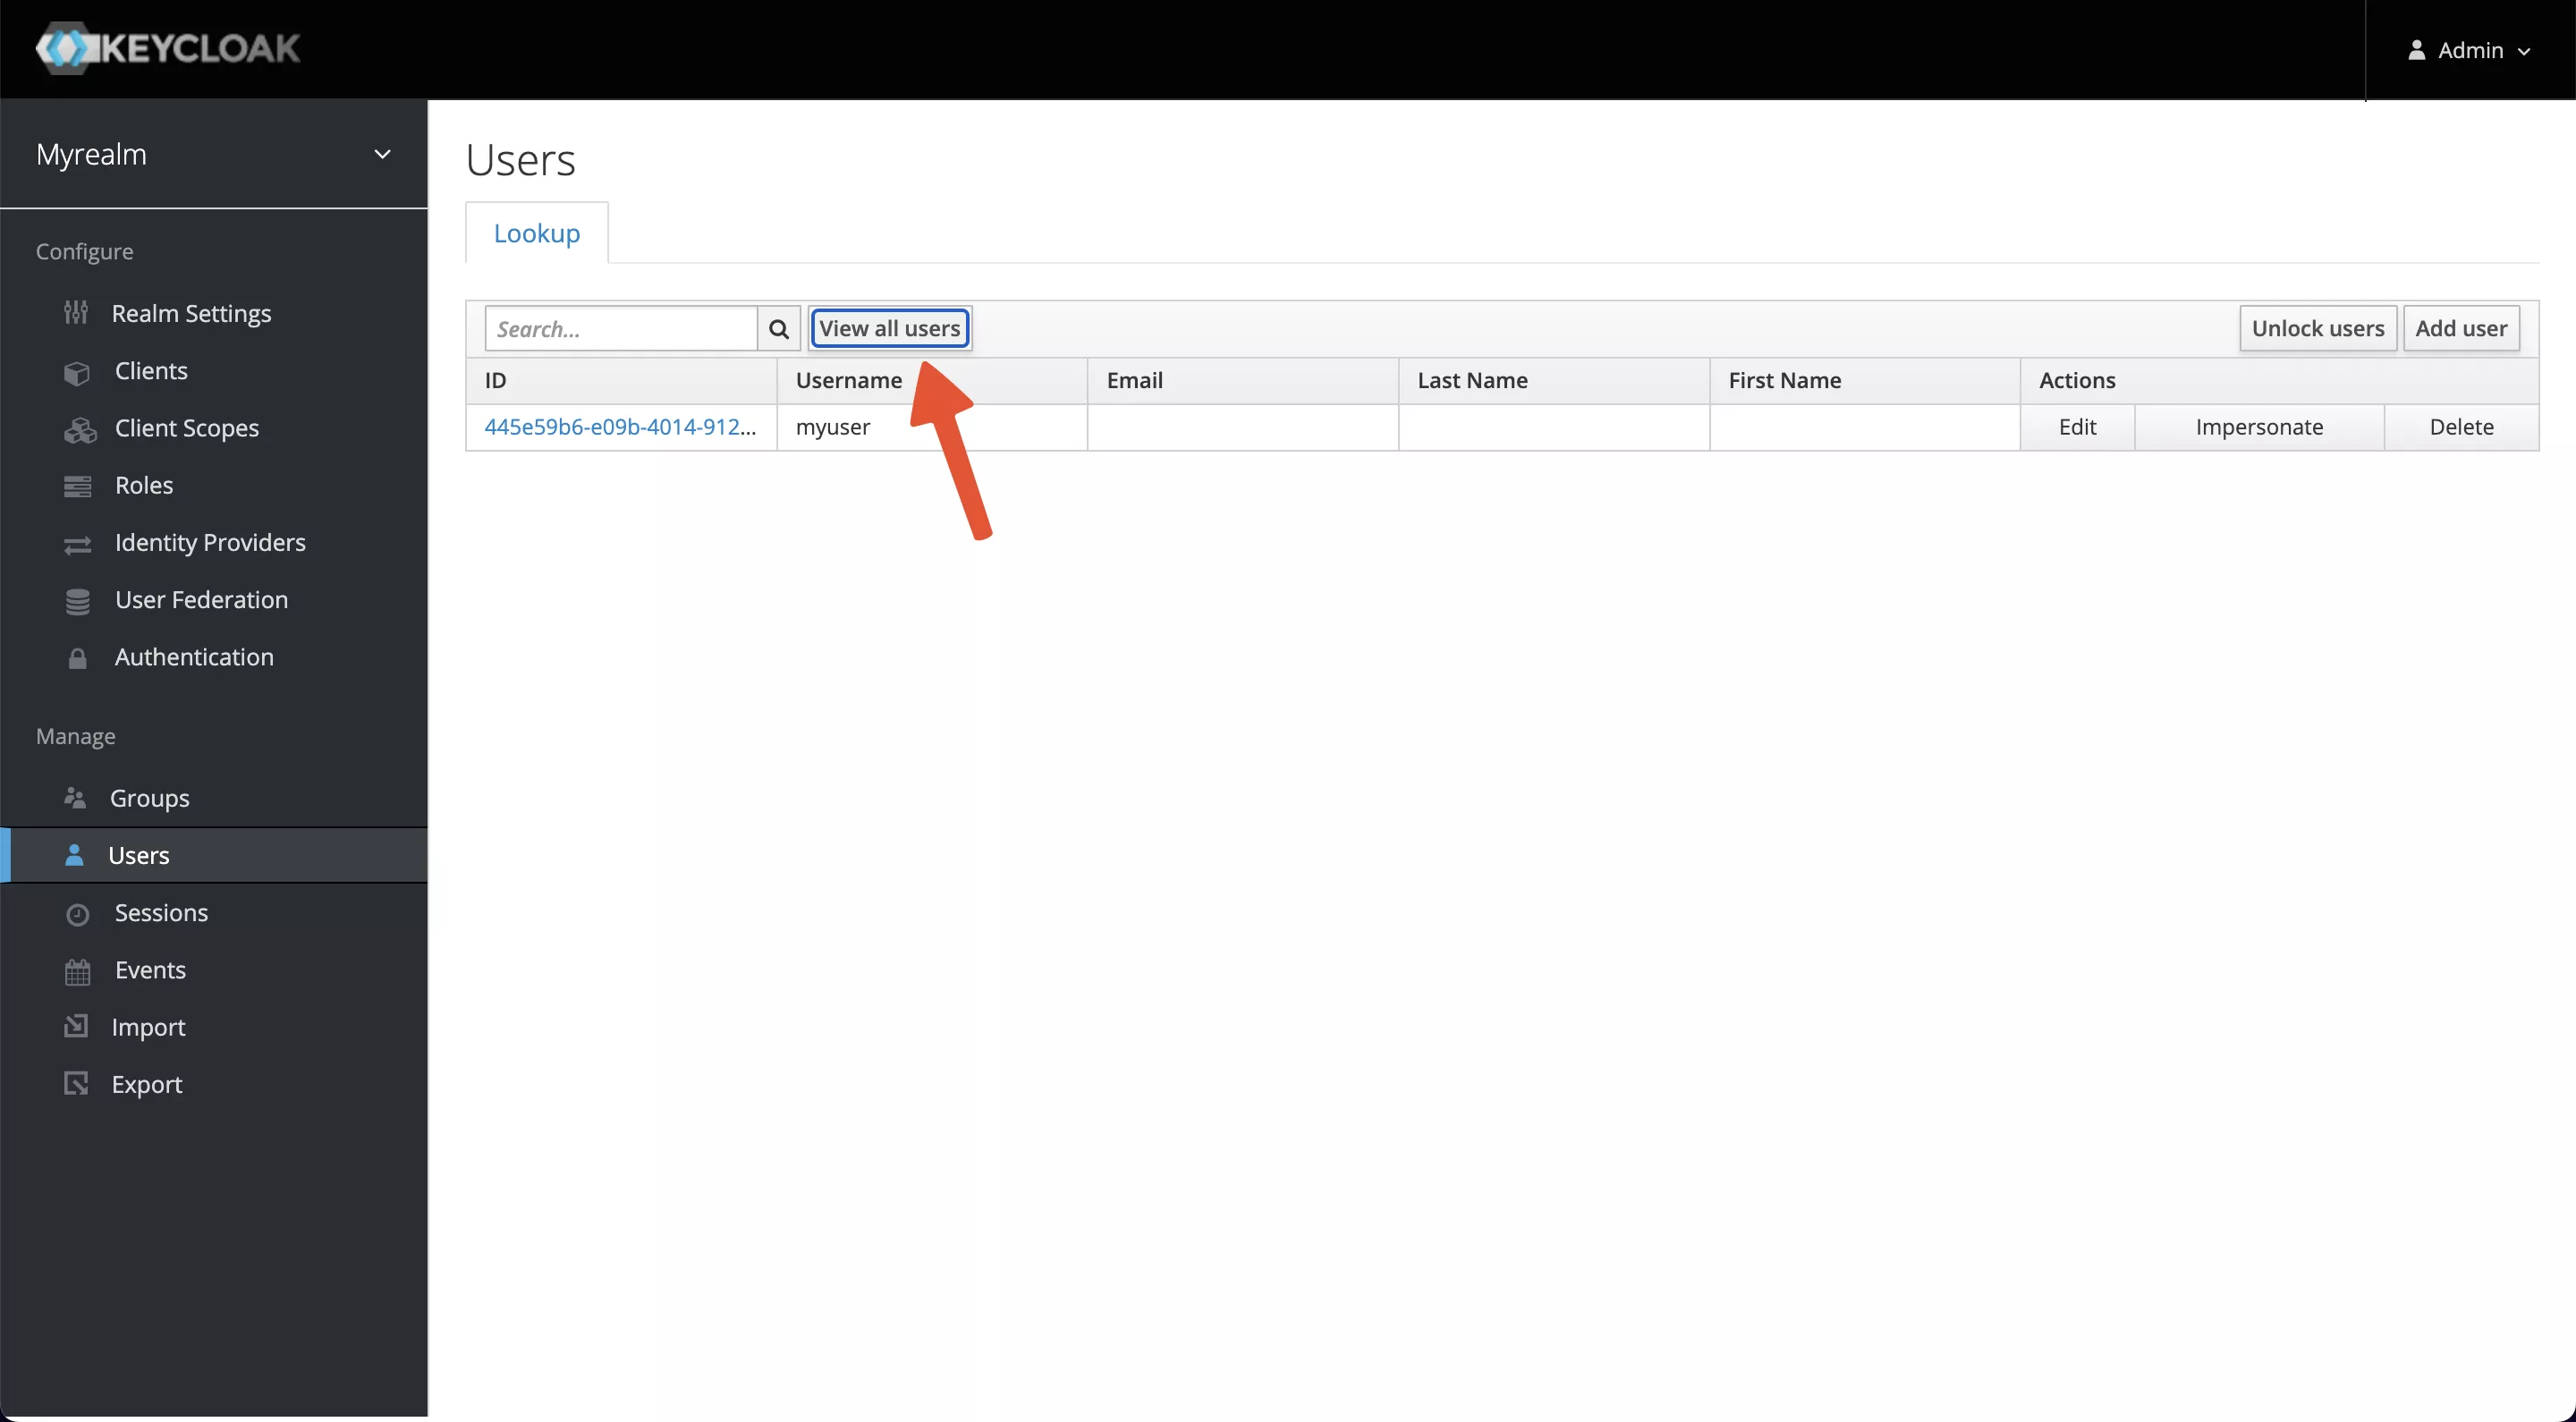
A user belongs to one realm, we need to create a user for login authentication. Select Manage -> Users -> Add user and enter myuser as the username, save it, then visit the Users page and select View all users.


Click on the ID, go to the Credentials tab, and set a new password (this example uses mypassword as the password). Also, set Temporary to OFF to turn off the restriction that you must change your password the first time you log in.
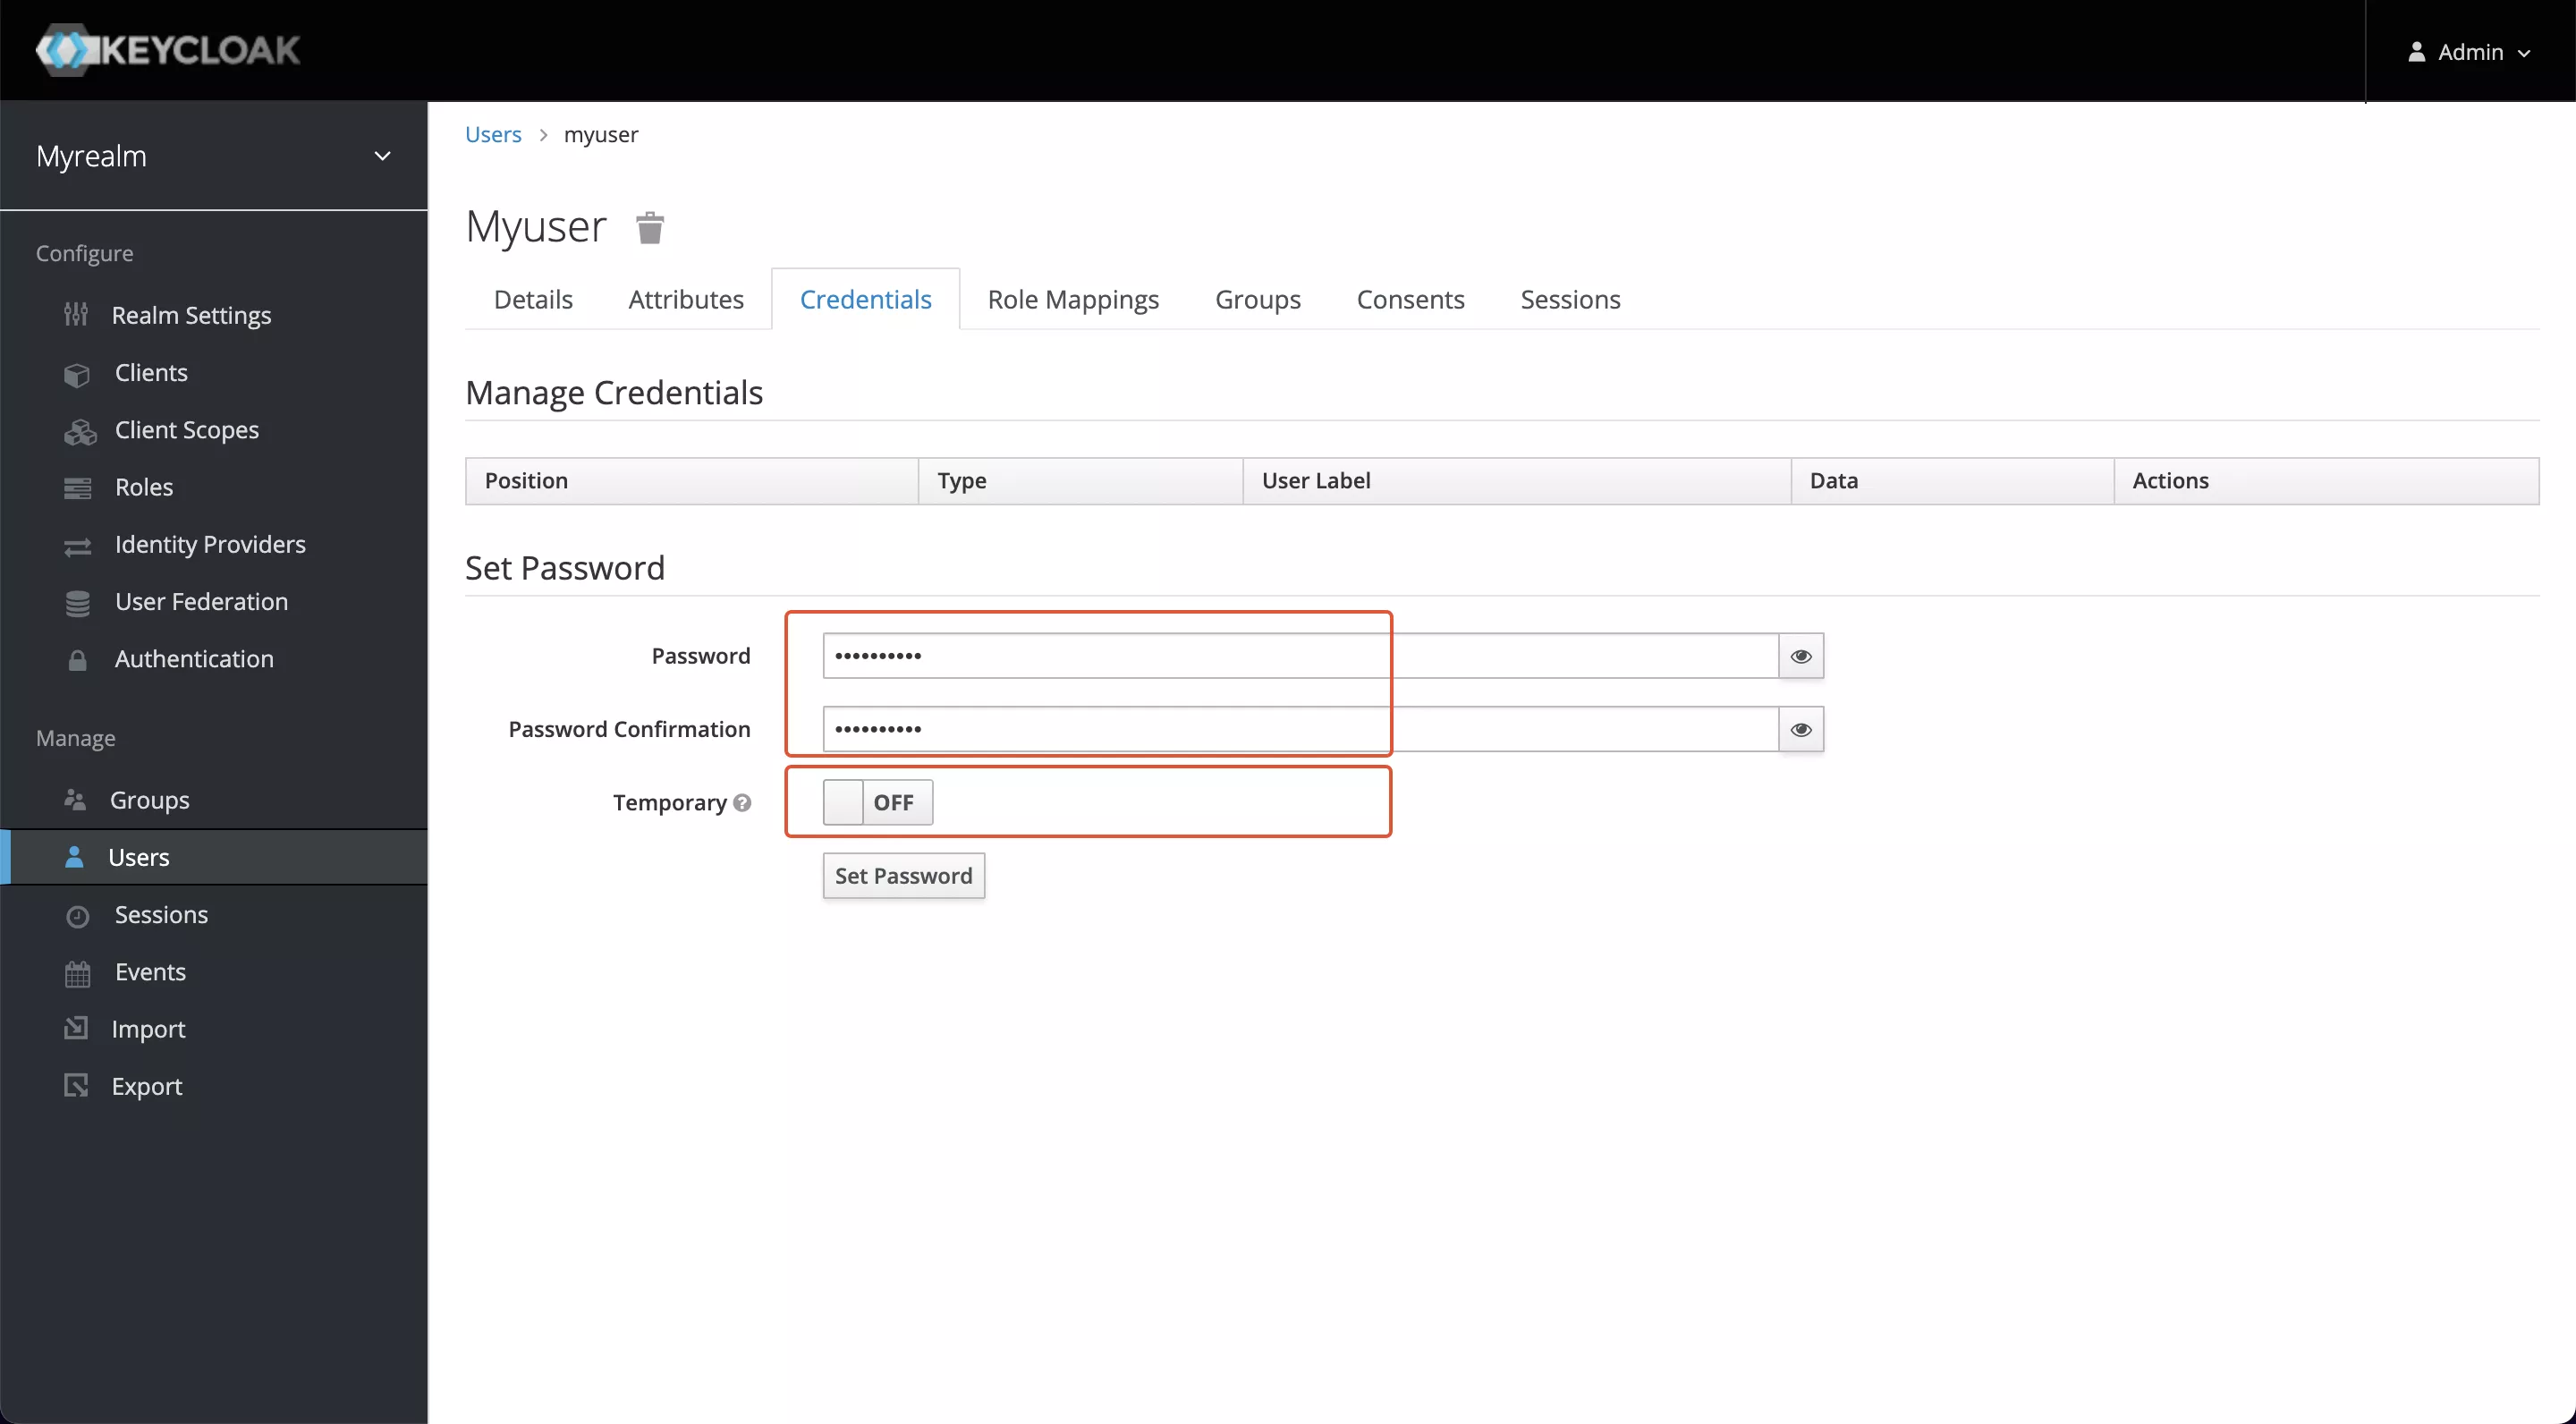

Click Set Password to save changes.
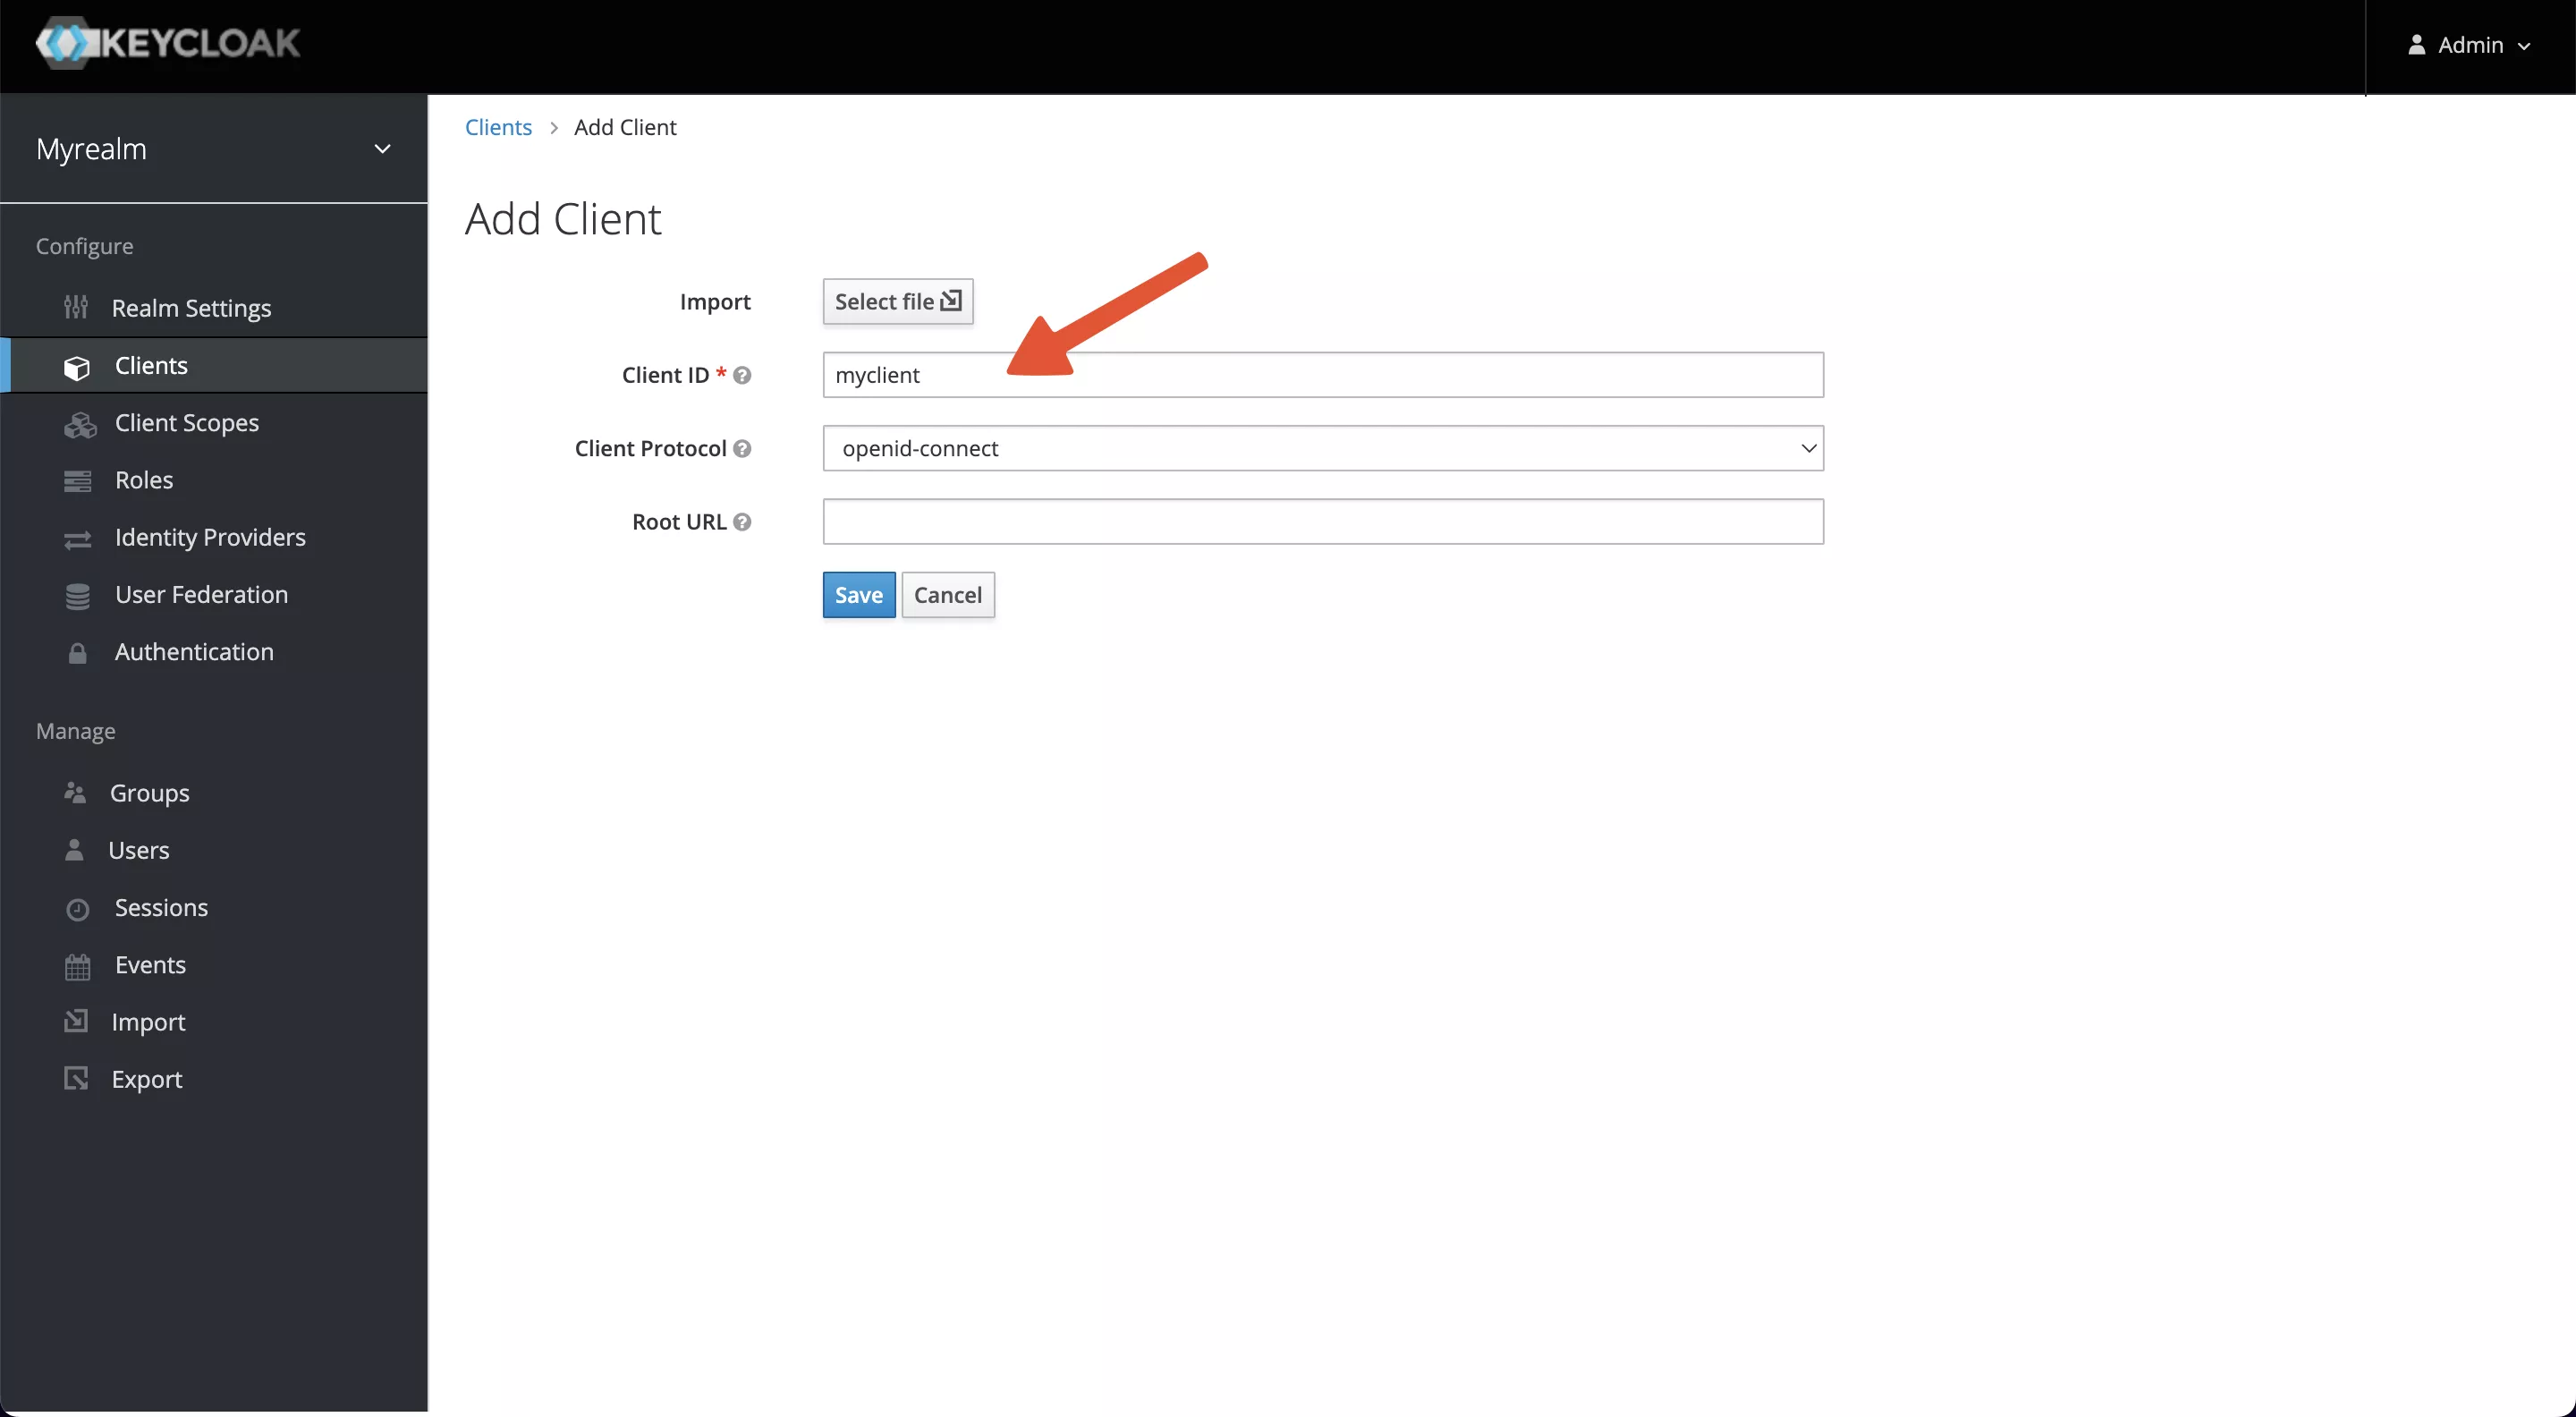
Create a Client
Visit Configure -> Clients -> Create to create a new client and obtain a Client ID and Client Secret, we will use that information in APISIX later.
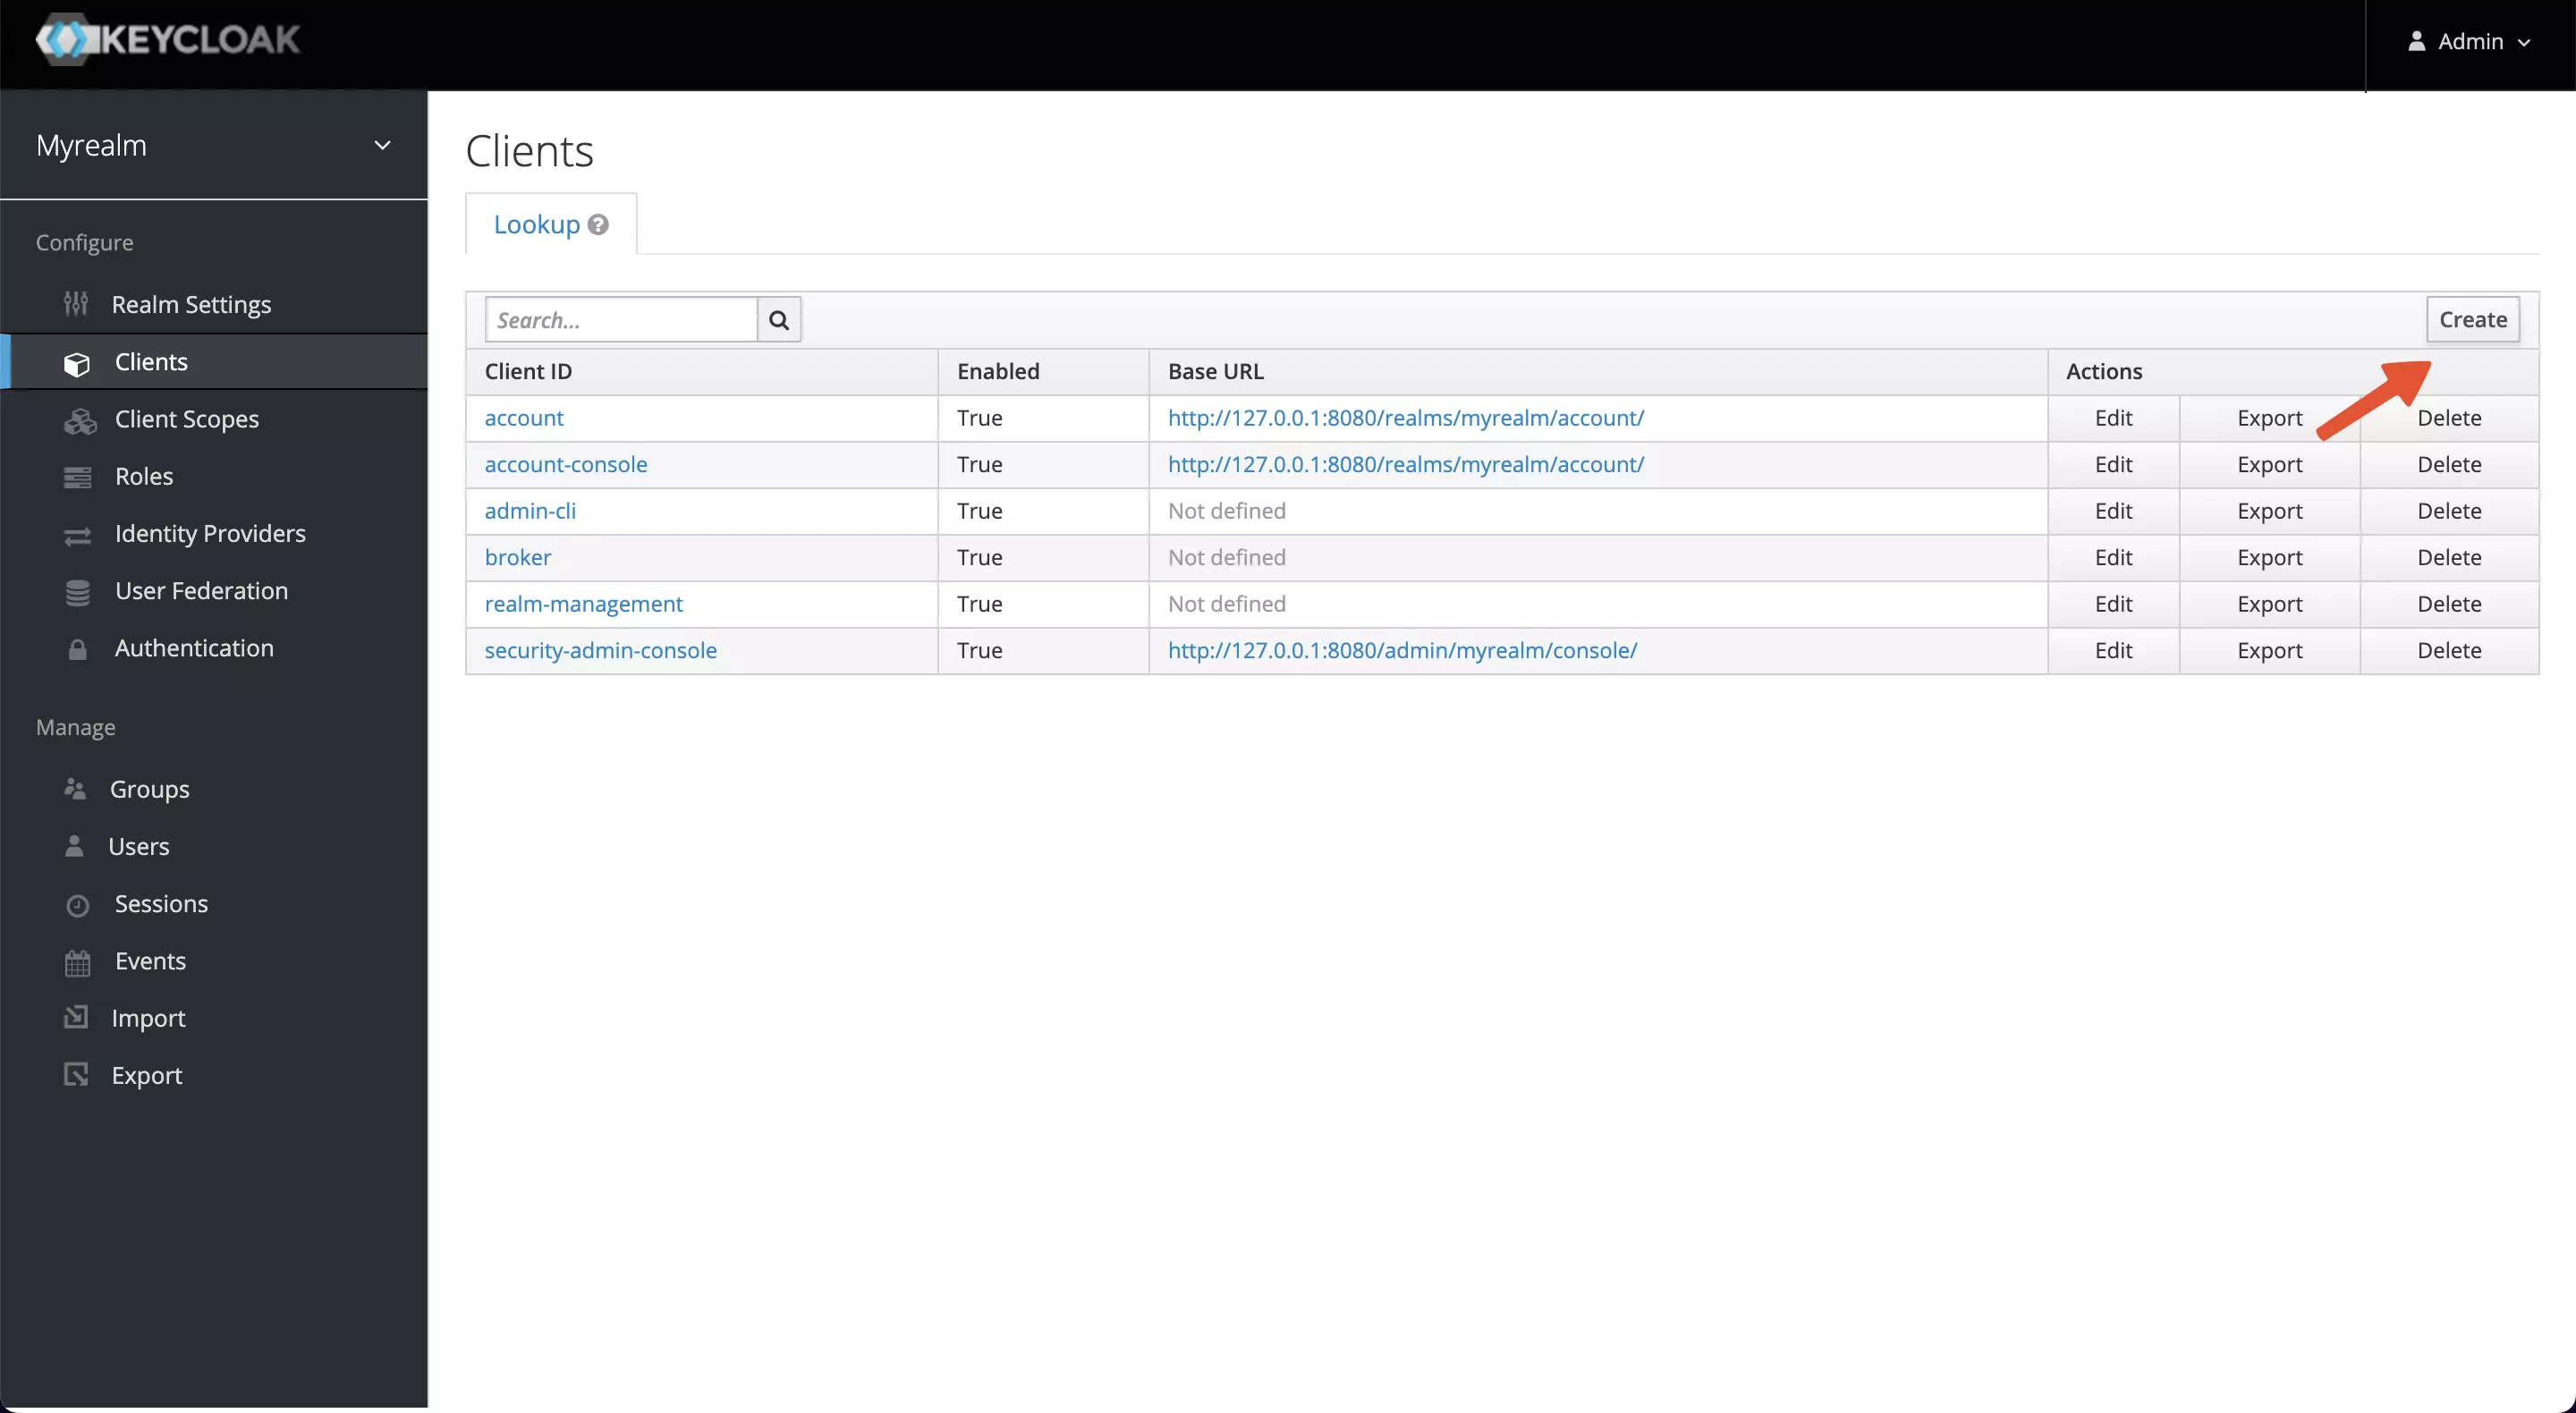

Enter the Client ID and save it. This example uses myclient as the ID.

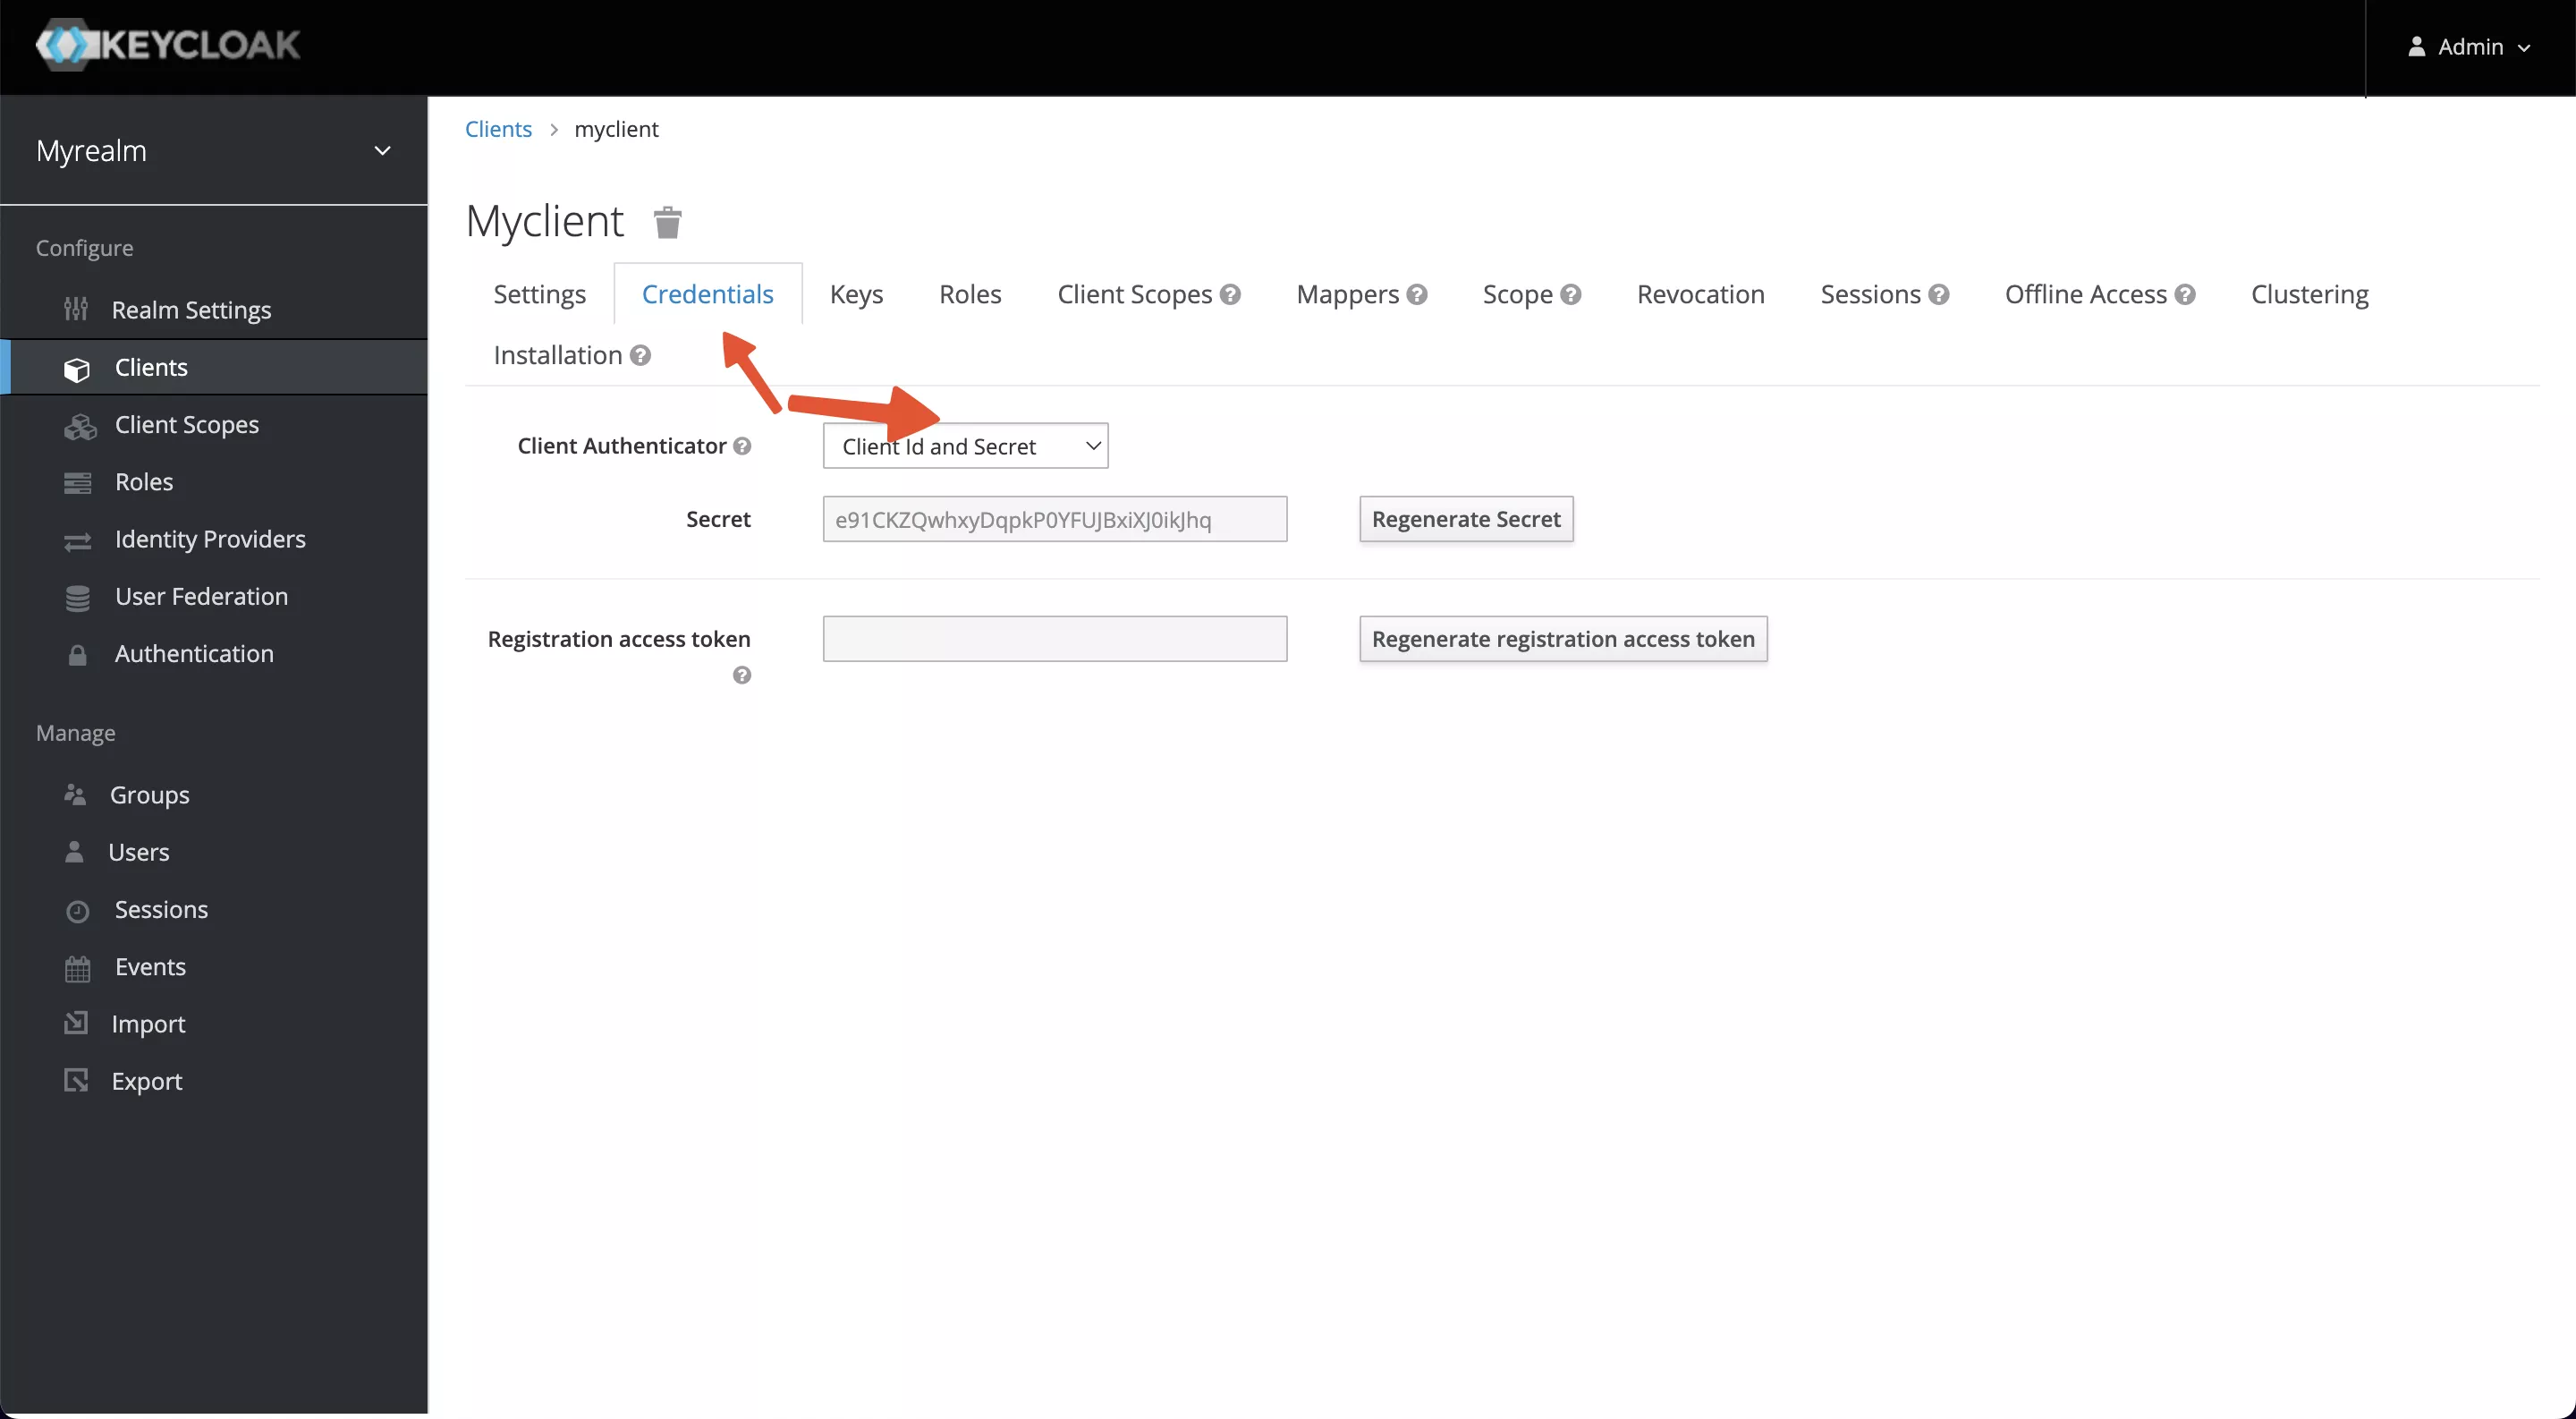
After saving, 2 parameters need to be configured.
- Access Type: default is public, please change it to credential to obtain Client Secret.
- Valid Redirect URIs: When the login is successful, Keycloak will carry the state and code to redirect the client to this address, so set it to a specific callback address for Apache APISIX, for example:
http://127.0.0.1:9080/anything/callback


When the settings are complete and saved, the Credentials tab will appear at the top of the page, and please copy the Secret value (Client Secret).

Summary
Apache APISIX
Service URL: http://127.0.0.1:9080/
Keycloak
- Service URL:
http://127.0.0.1:8080/ - Realm:
myrealm - Client ID:
myclient - Client Secret:
e91CKZQwhxyDqpkP0YFUJBxiXJ0ikJhq - Redirect URI:
http://127.0.0.1:9080/anything/callback - Discovery:
http://127.0.0.1:8080/realms/myrealm/.well-known/openid-configuration - Logout URL:
/anything/logout - Bearer Only:
false - Username:
myuser - Password:
mypassword
Scenarios
Note
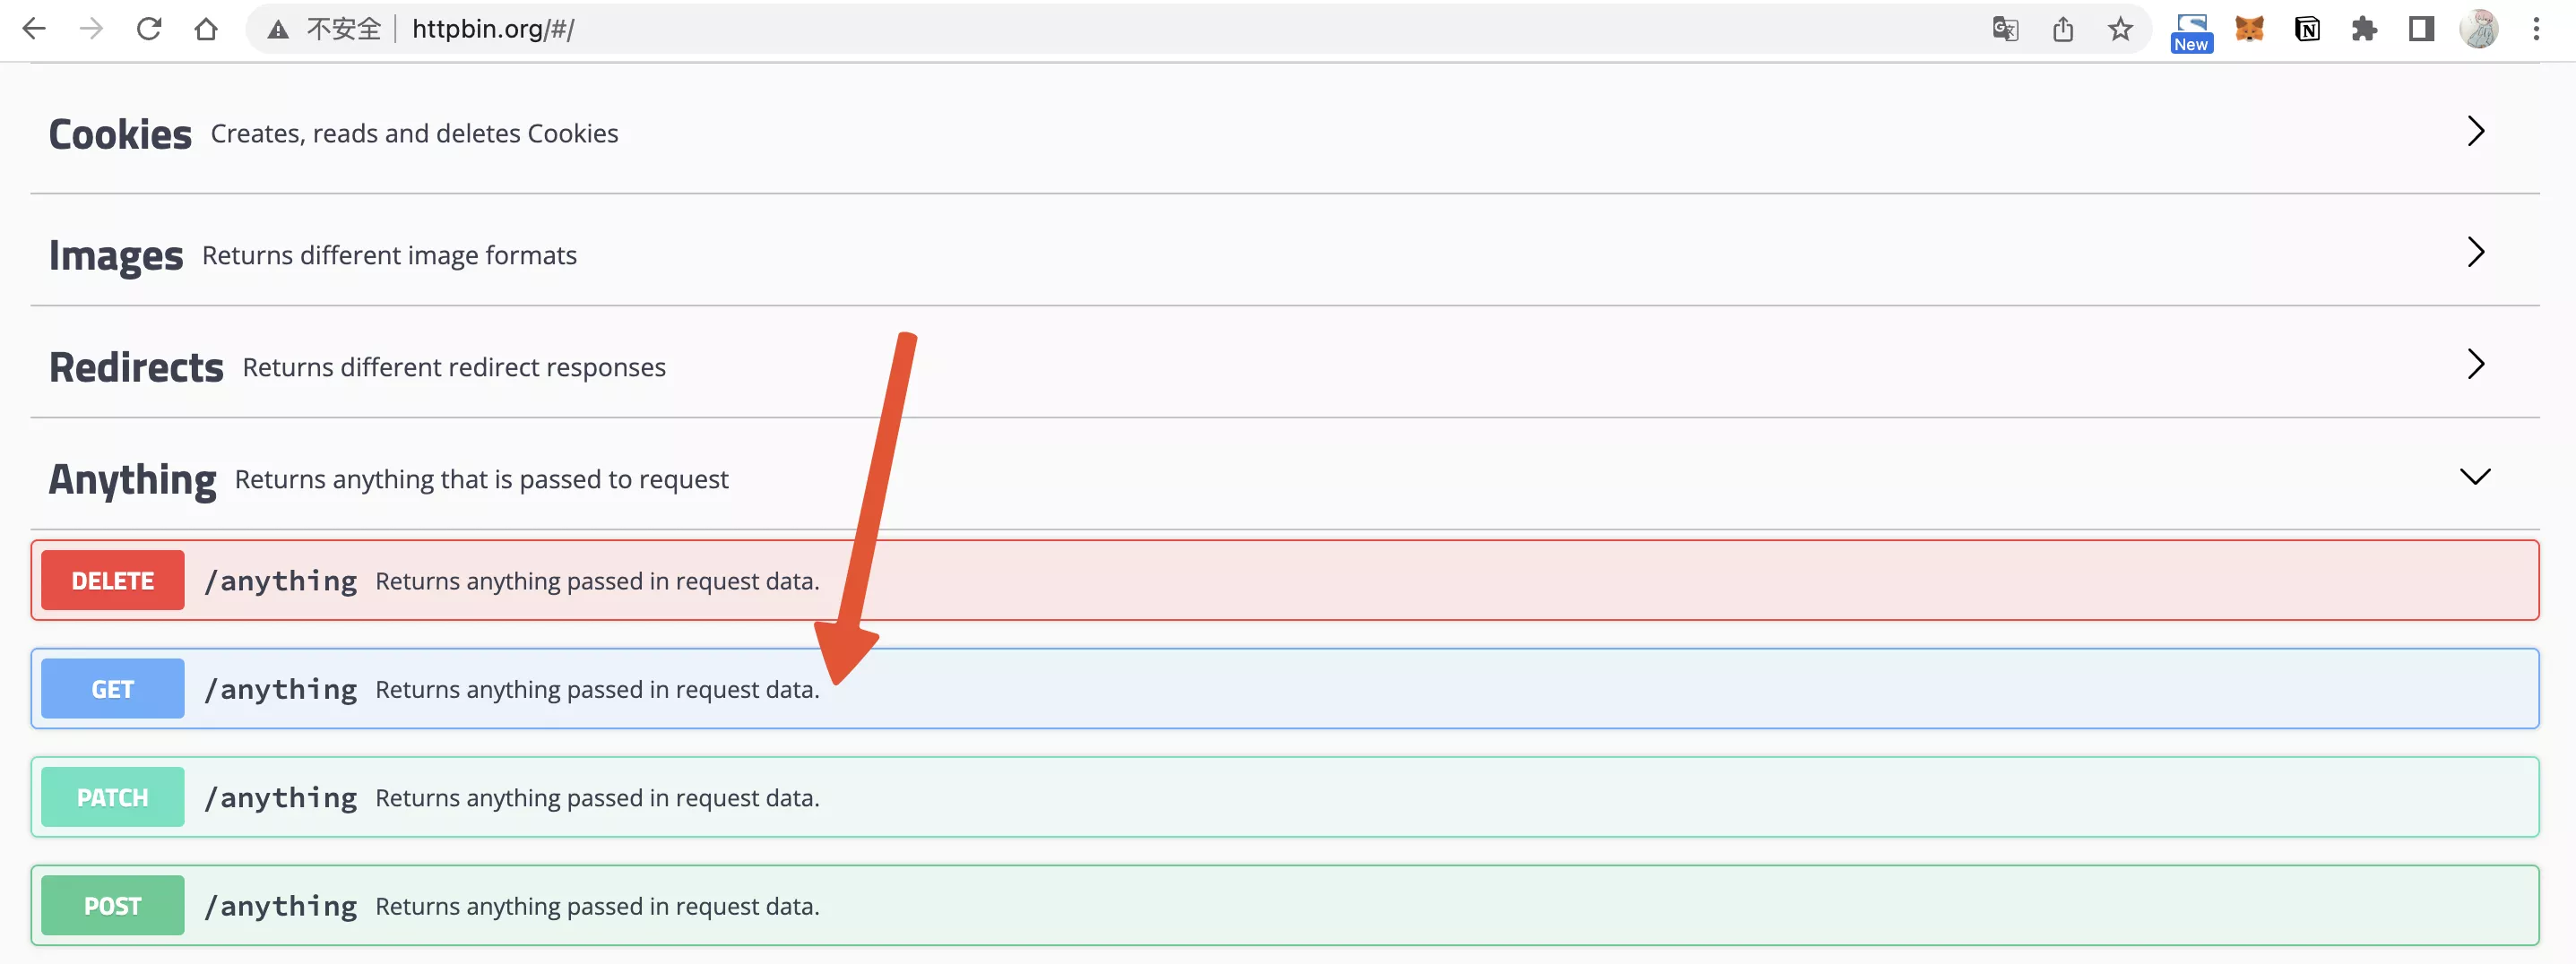
This guide will use a public service httpbin.org/anything as the upstream service, it will return anything passed in request data.

Case 1: Use username/password to protect service
This example will direct the client to the login page to authenticate using a username and password.
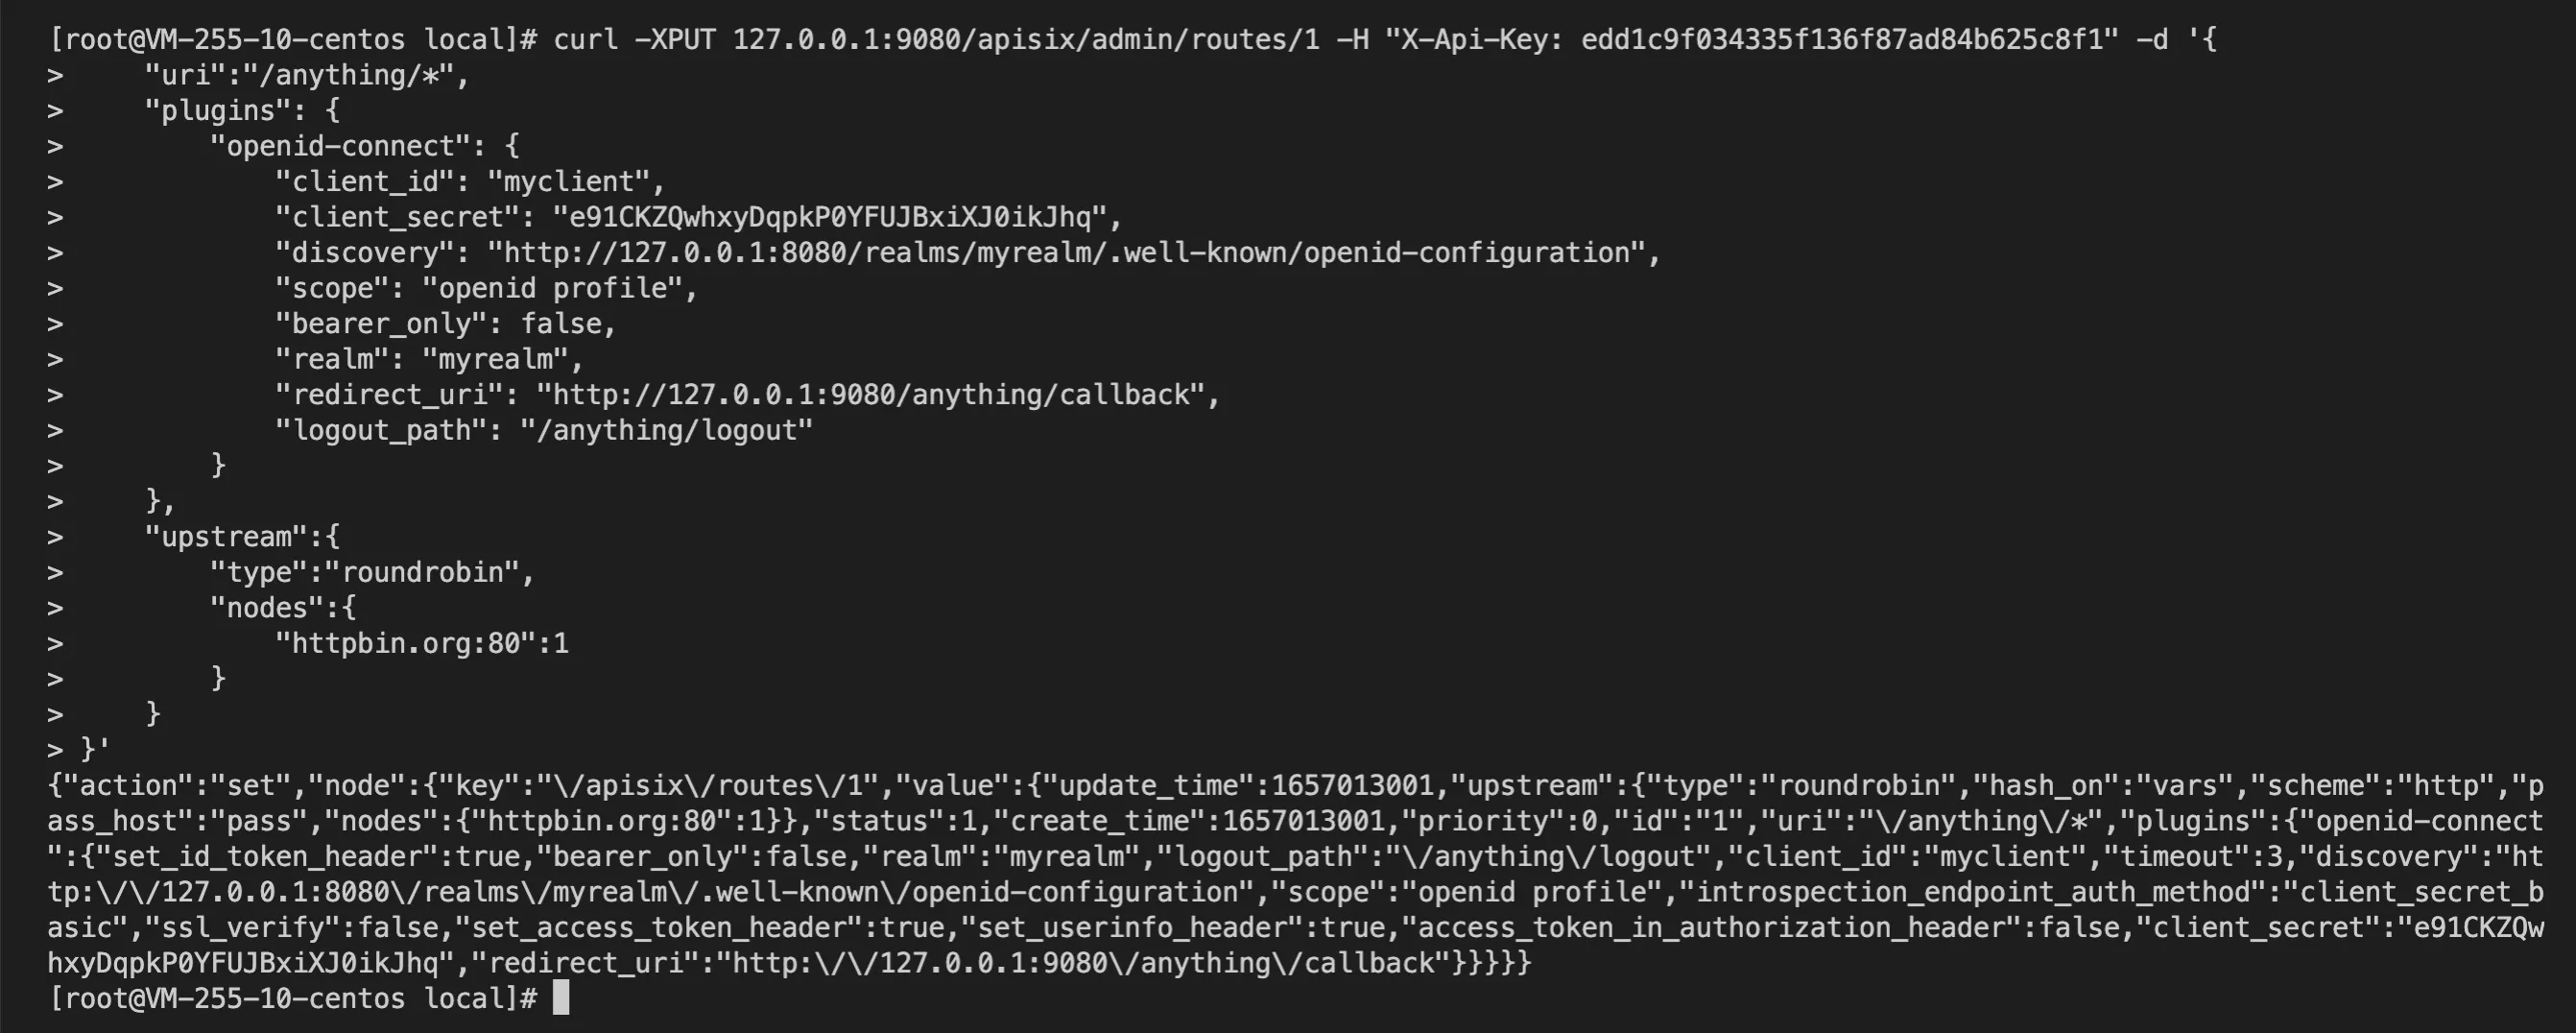
- Create an API:
curl -XPUT 127.0.0.1:9080/apisix/admin/routes/1 -H "X-API-KEY: edd1c9f034335f136f87ad84b625c8f1" -d '{
    "uri":"/anything/*",
    "plugins": {
        "openid-connect": {
            "client_id": "myclient",
            "client_secret": "e91CKZQwhxyDqpkP0YFUJBxiXJ0ikJhq",
            "discovery": "http://127.0.0.1:8080/realms/myrealm/.well-known/openid-configuration",
            "scope": "openid profile",
            "bearer_only": false,
            "realm": "myrealm",
            "redirect_uri": "http://127.0.0.1:9080/anything/callback",
            "logout_path": "/anything/logout"
        }
    },
    "upstream":{
        "type":"roundrobin",
        "nodes":{
            "httpbin.org:80":1
        }
    }
}'

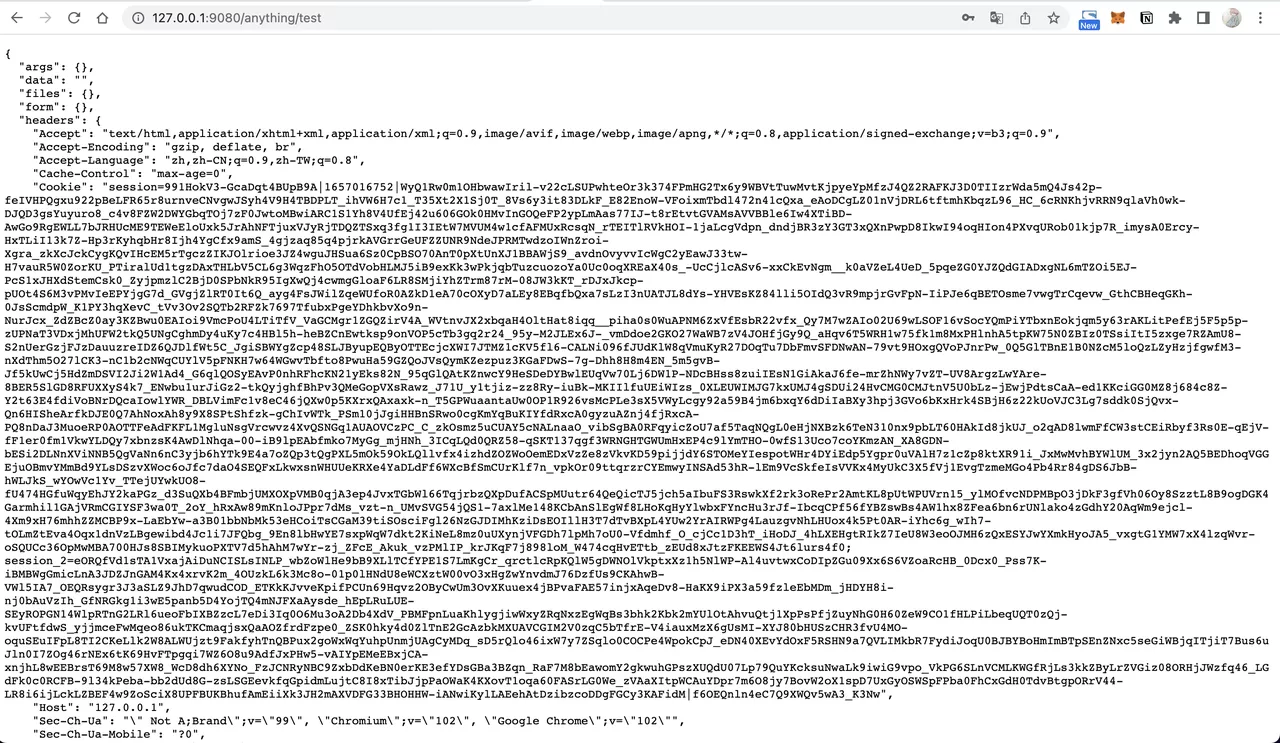
- When you visit
http://127.0.0.1:9080/anything/testafter successful API creation, APISIX will redirect your browser to Keycloak's login page because you need to log in.
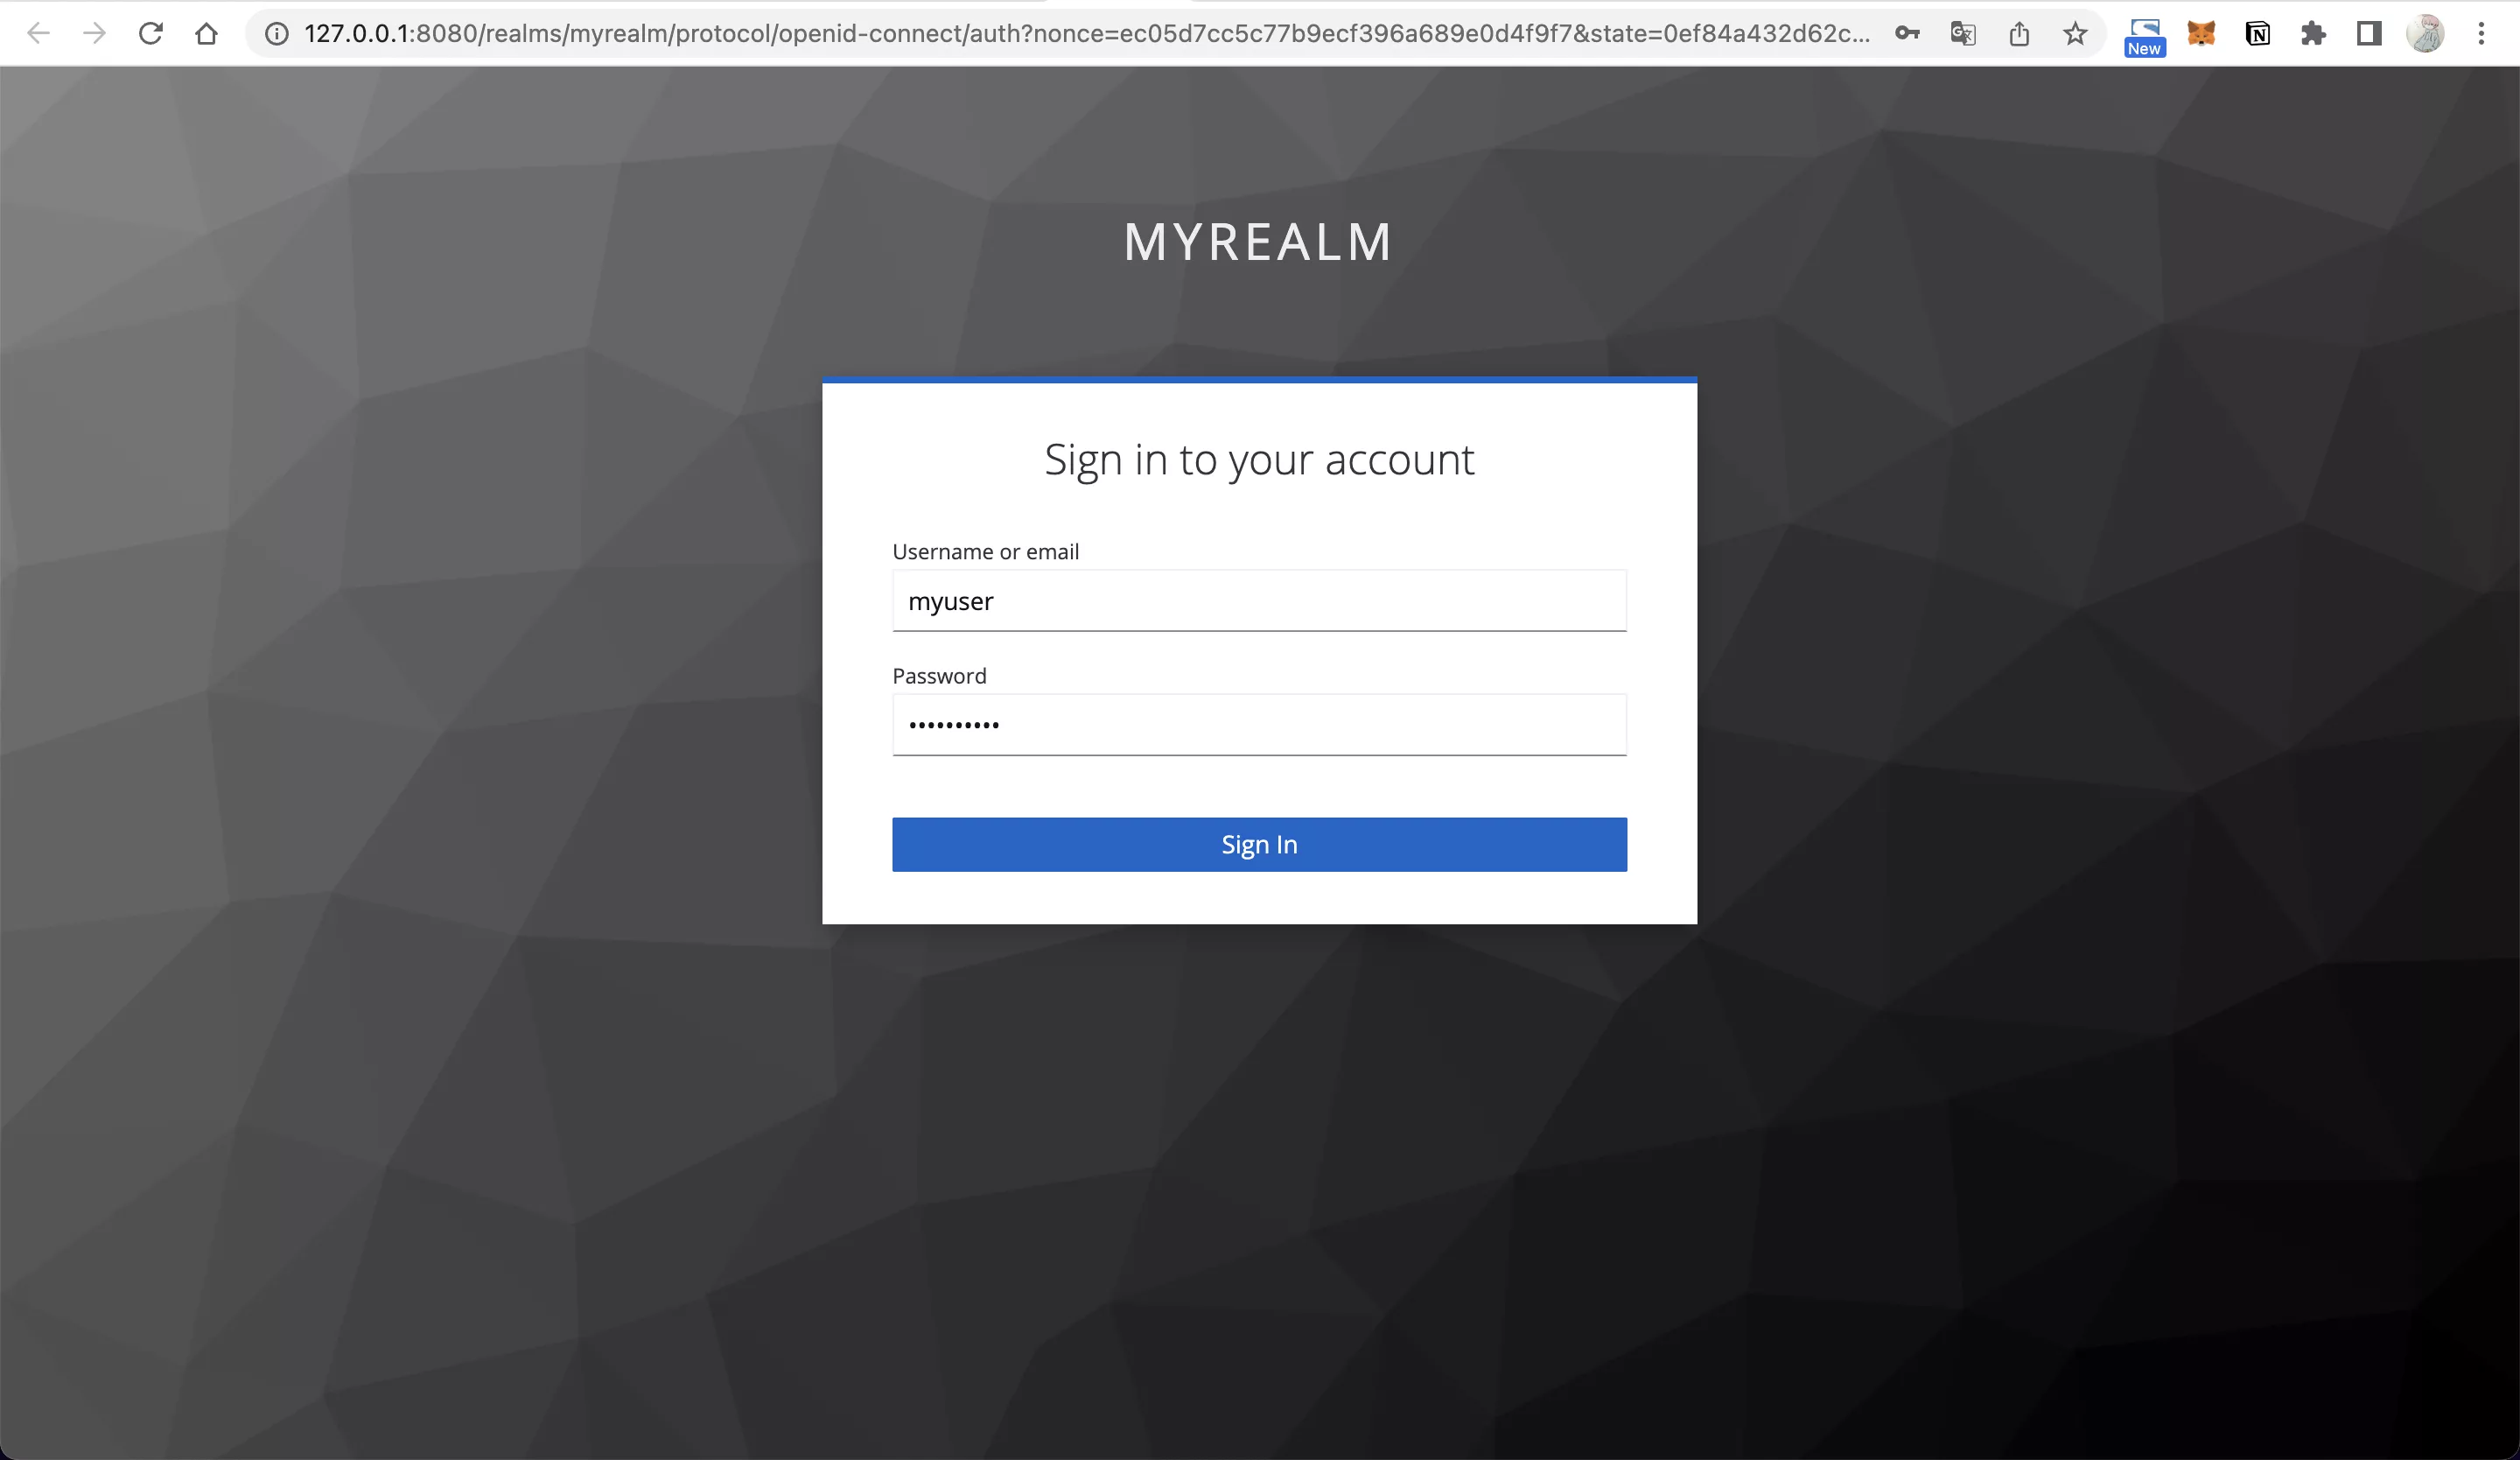
- Enter username (myuser) and password (mypassword) to log in, and your browser will redirect to
http://127.0.0.1:9080/anything/test.

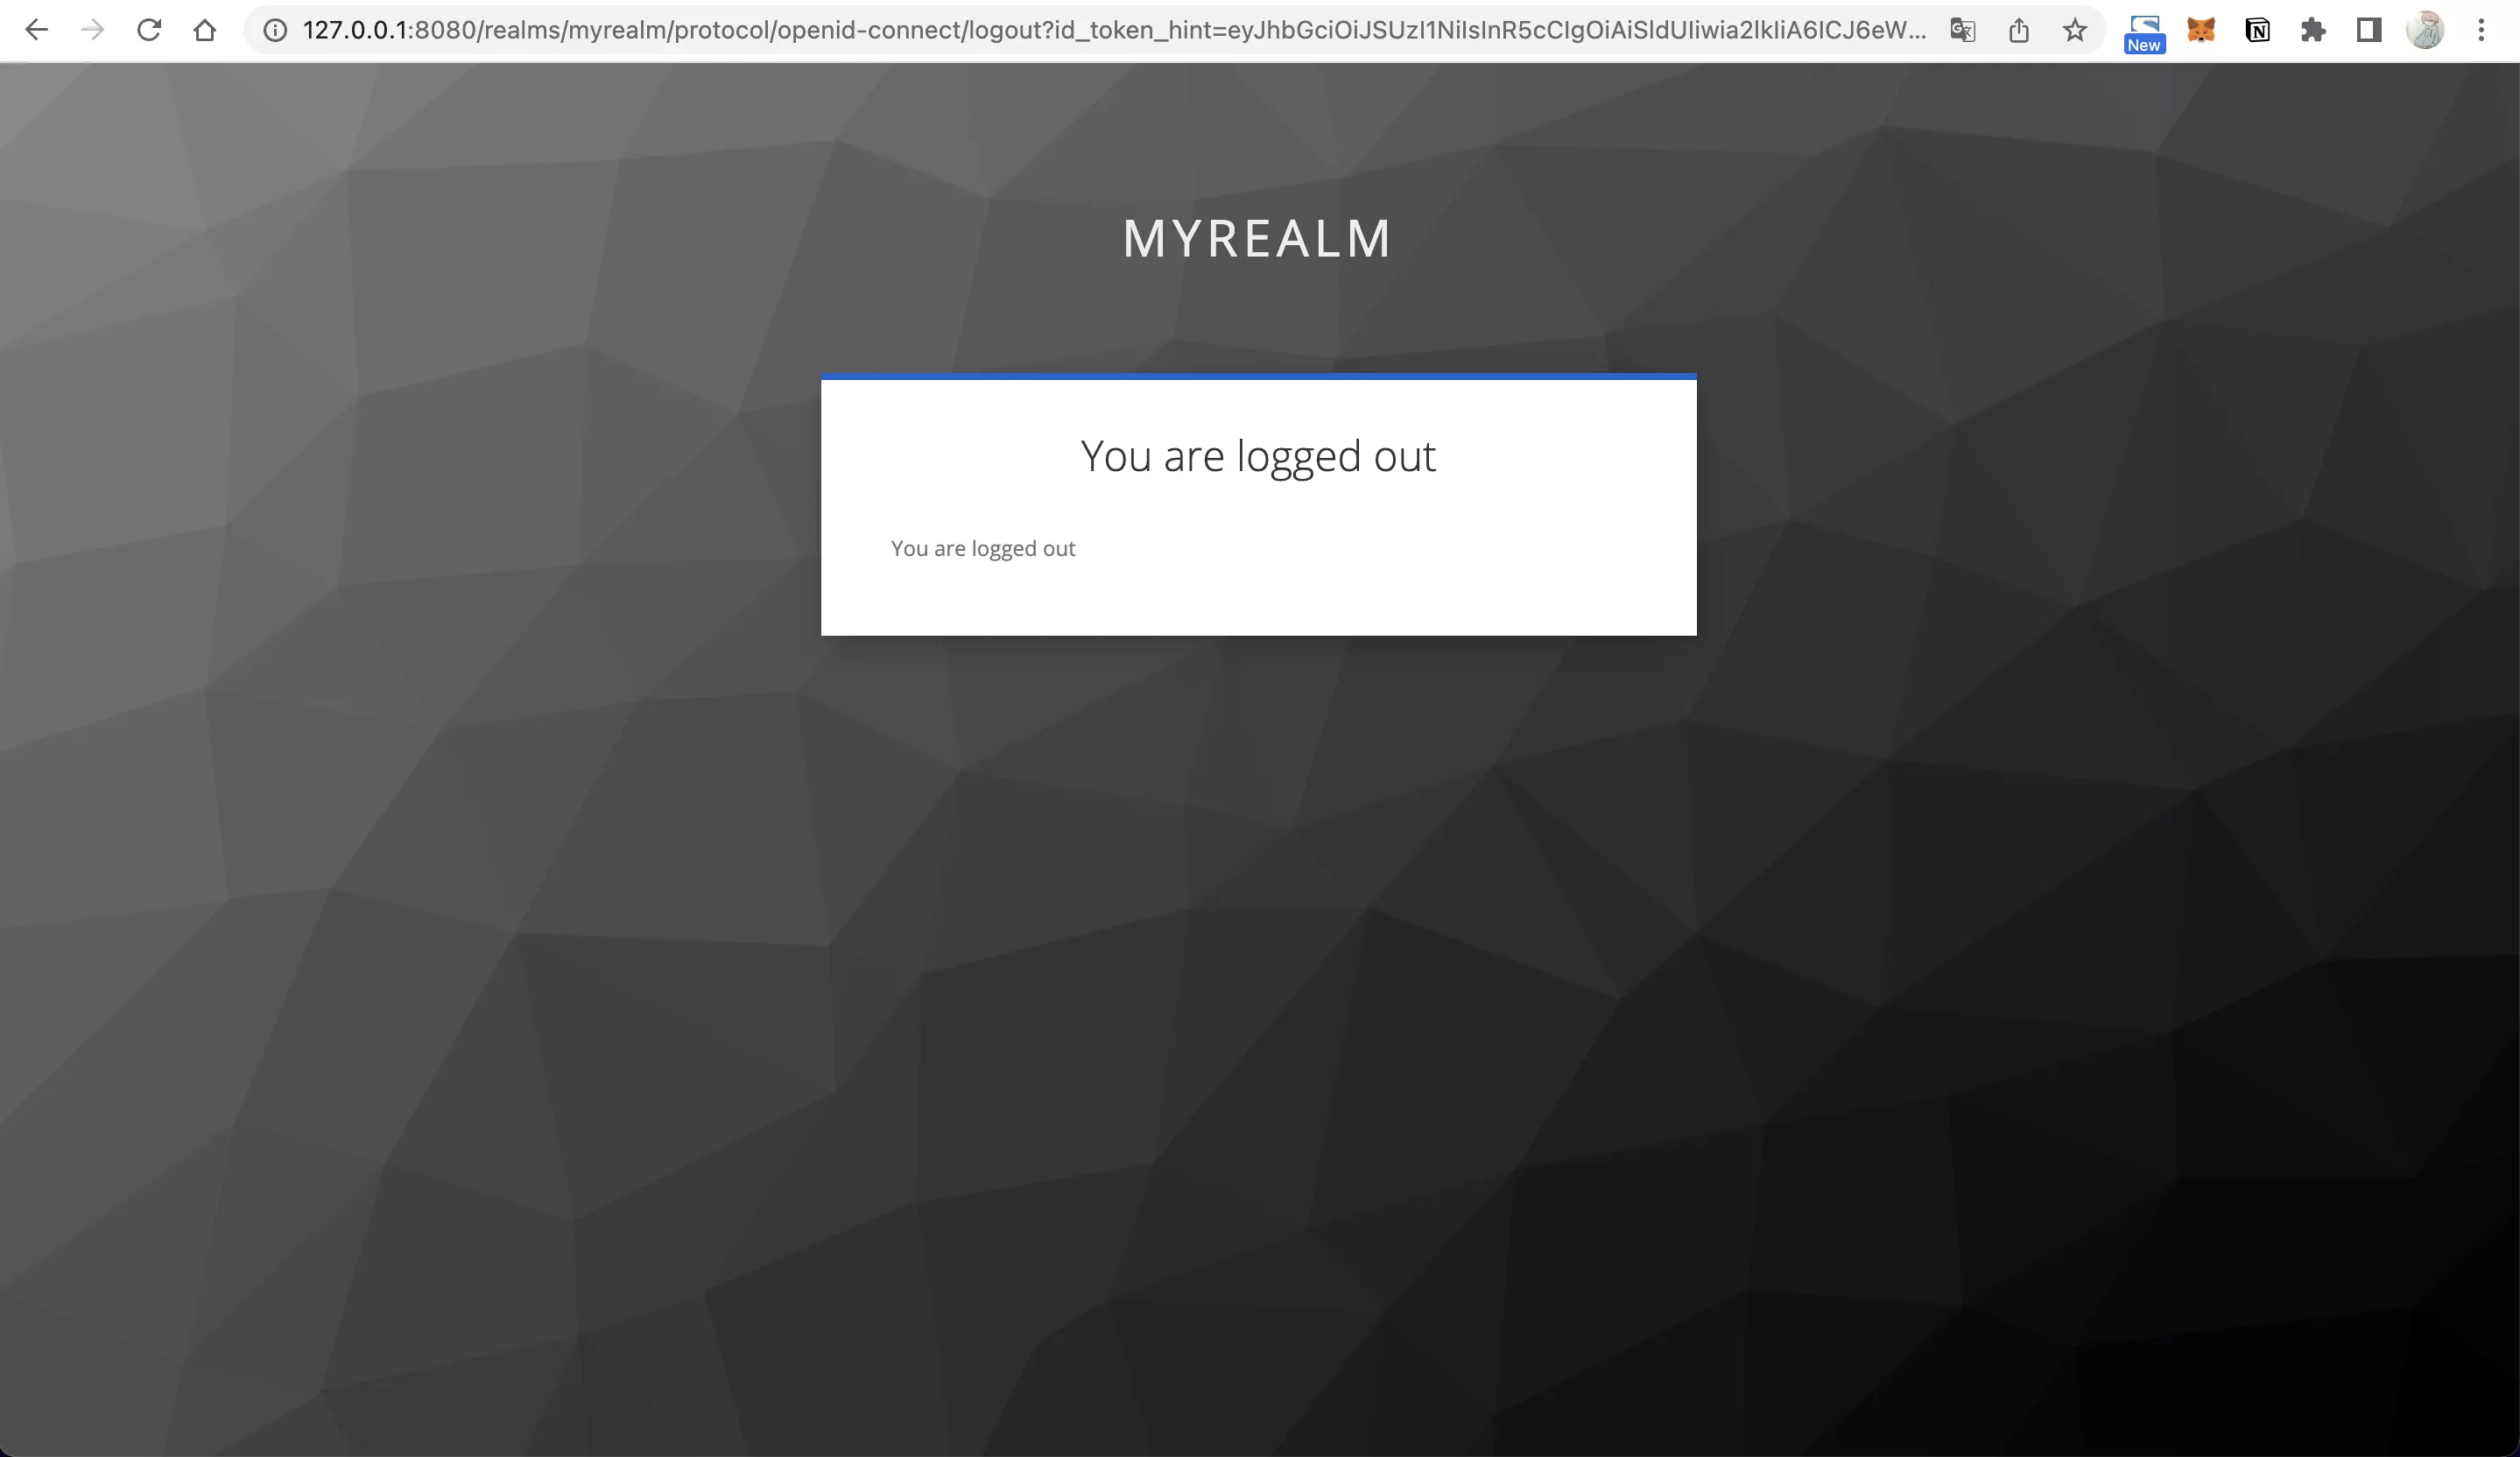
- Visit
http://127.0.0.1:9080/anything/logoutto log out:

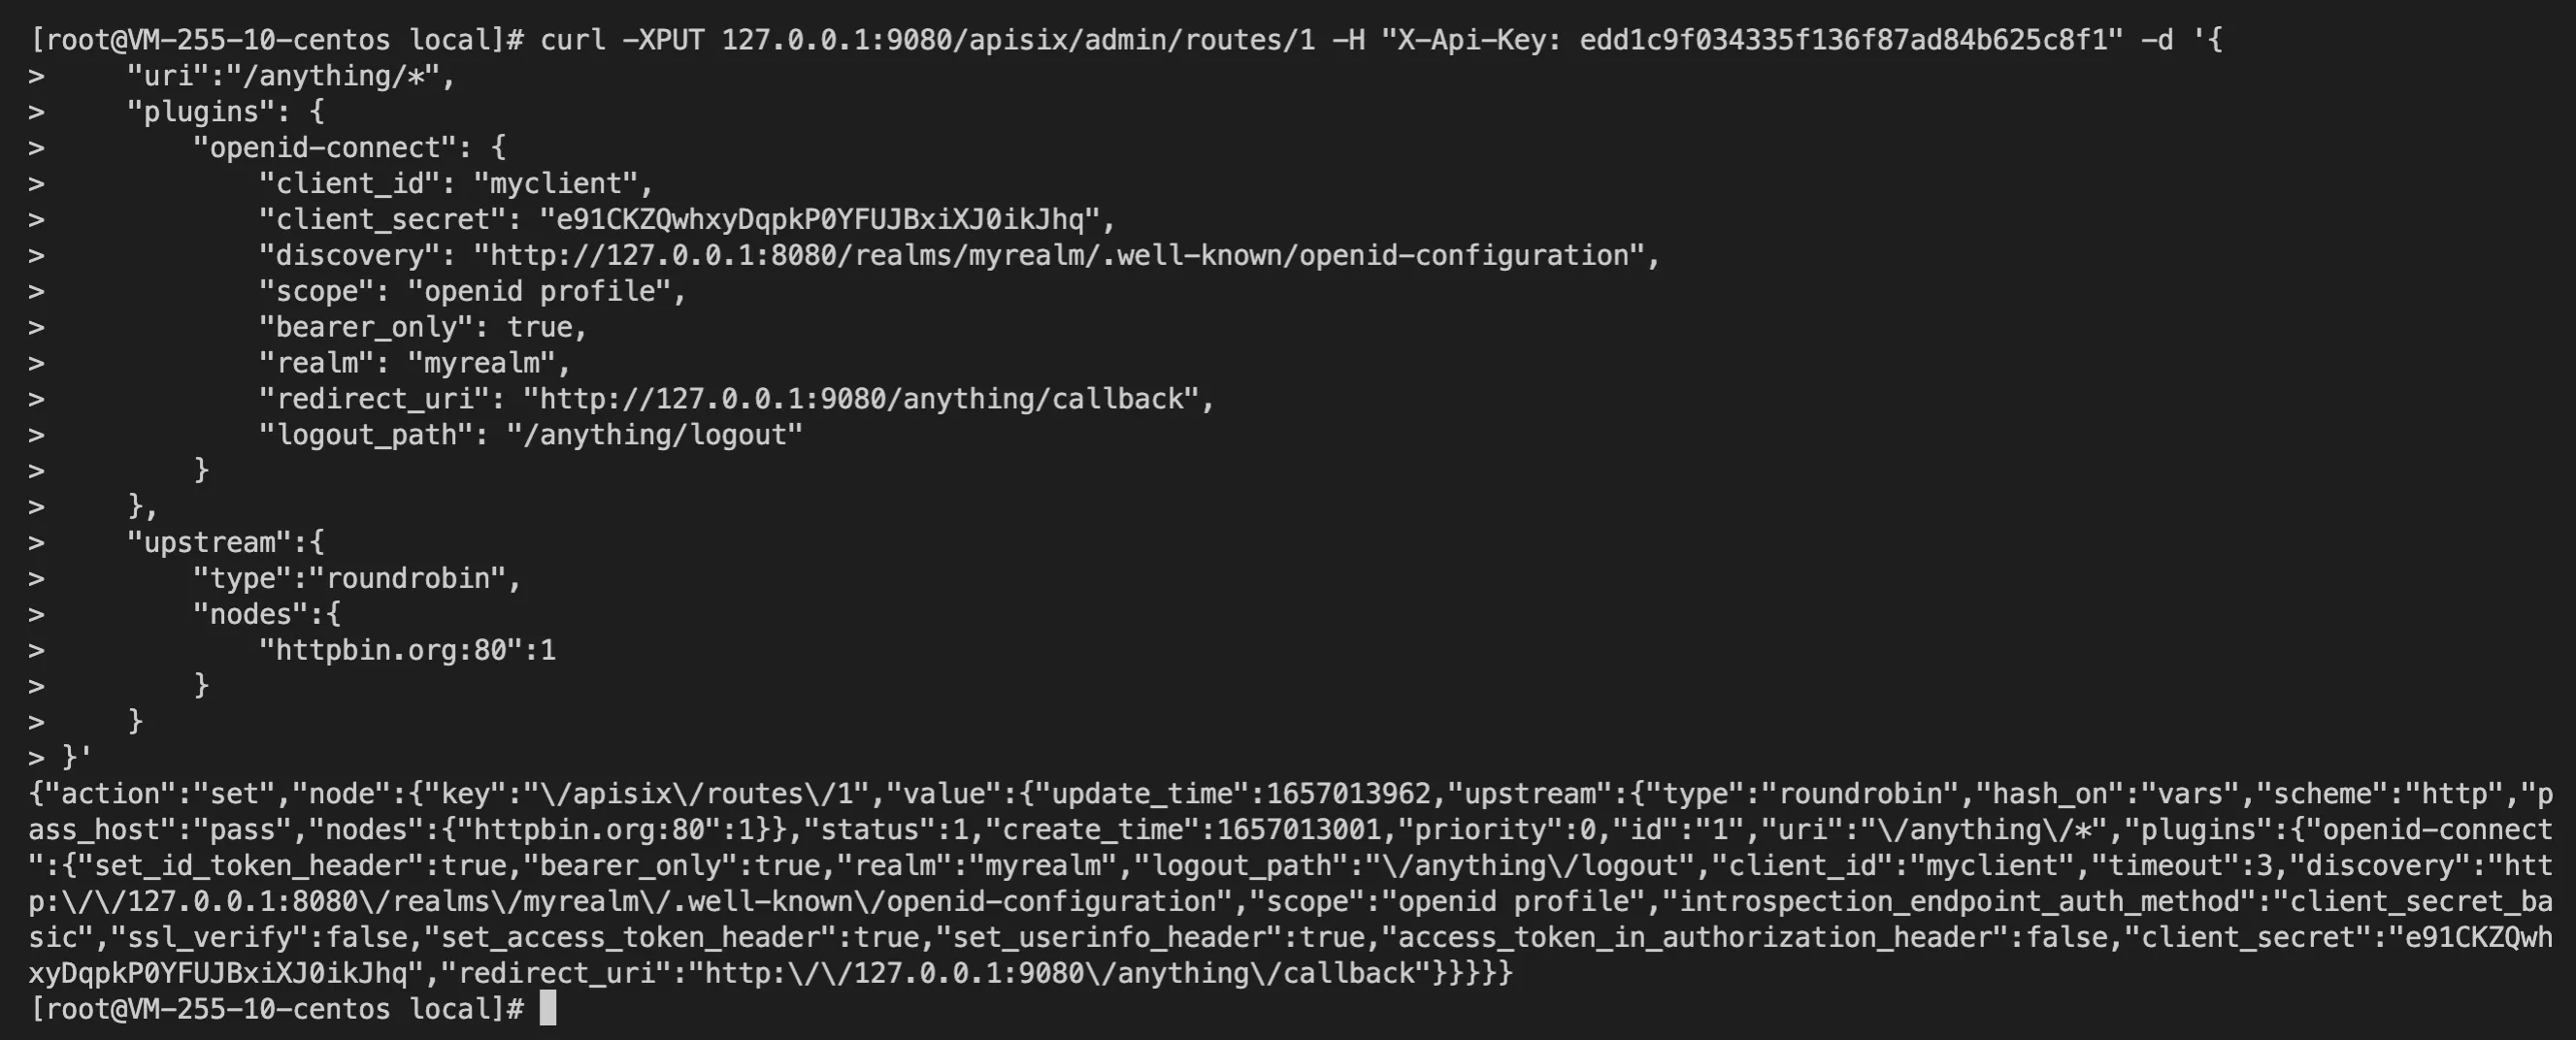
Case 2: Use AccessToken to authenticate
By enabling the bearer_only parameter to authenticate calls between services, the service must carry the Authorization Header when accessing APISIX. Otherwise, APISIX will reject the request.
- Create an API:
curl -XPUT 127.0.0.1:9080/apisix/admin/routes/1 -H "X-API-KEY: edd1c9f034335f136f87ad84b625c8f1" -d '{
    "uri":"/anything/*",
    "plugins": {
        "openid-connect": {
            "client_id": "myclient",
            "client_secret": "e91CKZQwhxyDqpkP0YFUJBxiXJ0ikJhq",
            "discovery": "http://127.0.0.1:8080/realms/myrealm/.well-known/openid-configuration",
            "scope": "openid profile",
            "bearer_only": true,
            "realm": "myrealm",
            "redirect_uri": "http://127.0.0.1:9080/anything/callback",
            "logout_path": "/anything/logout"
        }
    },
    "upstream":{
        "type":"roundrobin",
        "nodes":{
            "httpbin.org:80":1
        }
    }
}'

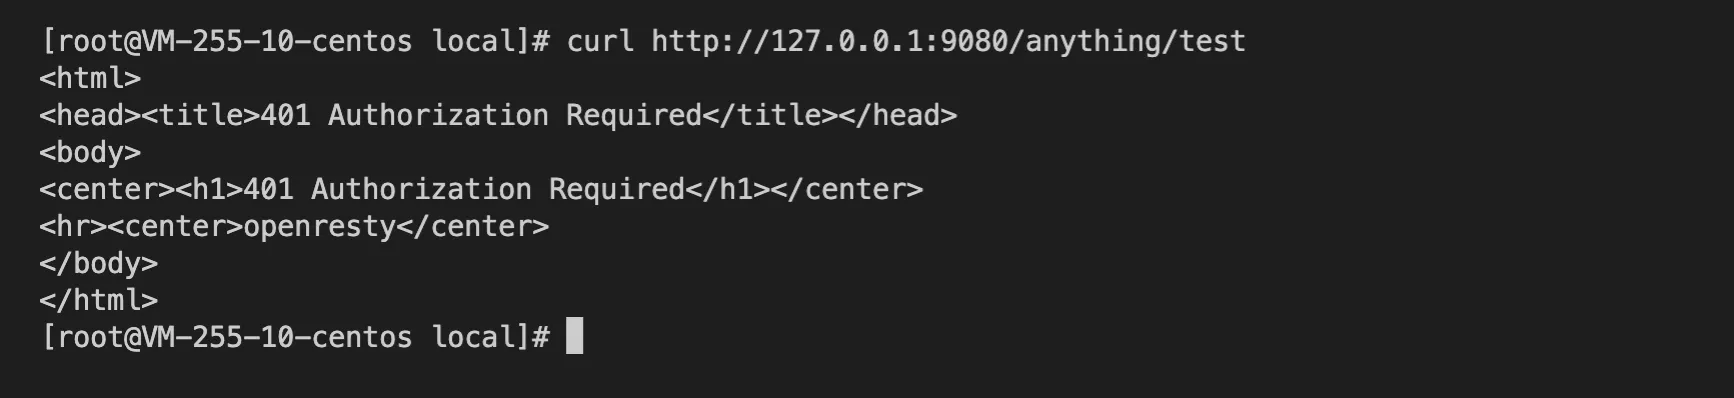
- Accessing Apache APISIX without an
X-Access-Tokenwill return 401 indicating unauthorized.

- Call the Keycloak API to obtain the AccessToken.
curl -XPOST "http://127.0.0.1:8080/realms/myrealm/protocol/openid-connect/token" -d "grant_type=password&username=myuser&client_id=myclient&client_secret=e91CKZQwhxyDqpkP0YFUJBxiXJ0ikJhq&password=mypassword"


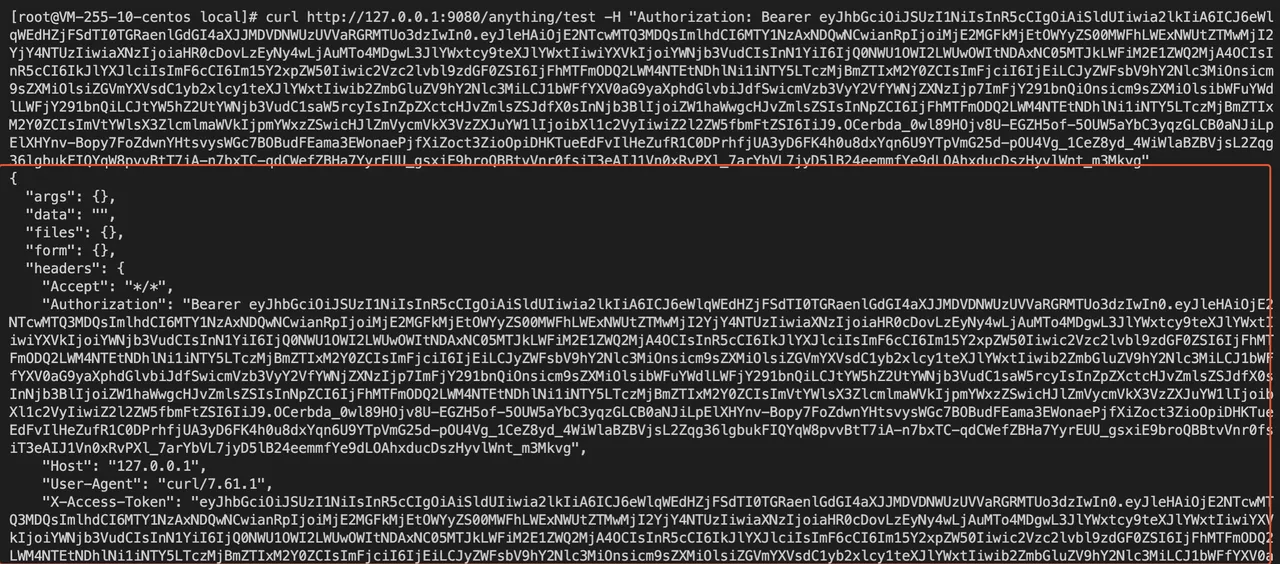
- Place the
AccessTokenin the Authorization header (replace${AccessToken}) to request APISIX, and you can authenticate successfully.
curl http://127.0.0.1:9080/anything/test -H "Authorization: Bearer ${AccessToken}"

Case 3: Parse UserInfo on upstream service
When APISIX's set_userinfo_header is enabled, the callback request after successful authentication will carry the X-Userinfo request header, which contains basic information about the User and can be used to obtain the user content via base64_decode.
FAQ
- Why is the cookie value very big in APISIX?
Because APISIX writes id_token, access_token, and refresh_token into the cookie, the entire cookie content is quite big. For detailed implementation, read the logic for setting up a session in the lua-resty-openidc library.
- How to change the name and location of the cookie stored in the Session?
Currently, the openid-connect plugin does not provide the ability to customize this part of the configuration, so we can use the method provided in lua-resty-session: override its default configuration by NGINX variables.
We rely on the NGINX configuration injection capabilities provided by APISIX to achieve the override: the name of the Session storage cookie can be modified by adding this code to the configuration file {apisix}/conf/config.yaml.
nginx_config:
  http_server_configuration_snippet: |
    set $session_name "session_override";
For more information please visit: