Control API
control API 可以被用来:
- 暴露 APISIX 内部状态信息
- 控制单个 APISIX 的数据平面的行为
默认情况下,control API 是启用的,监听 127.0.0.1:9090。你可以通过修改 apisix/conf/config.yaml 中的 control 部分来更改设置,如下:
apisix:
  ...
  enable_control: true
  control:
    ip: "127.0.0.1"
    port: 9090
插件的 control API 在默认情况下不支持参数匹配,如果想启用参数匹配功能可以在 control 部分添加 router: 'radixtree_uri_with_parameter'
注意:control API server 不应该被配置成监听公网地址。
通过插件添加的 control API#
APISIX 中一些插件添加了自己的 control API。如果你对他们感兴趣,请参阅对应插件的文档。
独立于插件的 control API#
以下是支持的 API:
GET /v1/schema#
引入自 2.2 版本
使用以下格式返回被该 APISIX 实例使用的 json schema:
{
    "main": {
        "route": {
            "properties": {...}
        },
        "upstream": {
            "properties": {...}
        },
        ...
    },
    "plugins": {
        "example-plugin": {
            "consumer_schema": {...},
            "metadata_schema": {...},
            "schema": {...},
            "type": ...,
            "priority": 0,
            "version": 0.1
        },
        ...
    },
    "stream-plugins": {
        "mqtt-proxy": {
            ...
        },
        ...
    }
}
只有启用了的插件才会被包含在返回结果中 plugins 部分。(返回结果中的)一些插件可能会缺失如 consumer_schema 或者 type 字段,这取决于插件的定义。
GET /v1/healthcheck#
引入自 2.3 版本
使用以下格式返回当前的 health check 状态
[
  {
    "nodes": [
      {
        "ip": "52.86.68.46",
        "counter": {
          "http_failure": 0,
          "success": 0,
          "timeout_failure": 0,
          "tcp_failure": 0
        },
        "port": 80,
        "status": "healthy"
      },
      {
        "ip": "100.24.156.8",
        "counter": {
          "http_failure": 5,
          "success": 0,
          "timeout_failure": 0,
          "tcp_failure": 0
        },
        "port": 80,
        "status": "unhealthy"
      }
    ],
    "name": "/apisix/routes/1",
    "type": "http"
  }
]
每个 entry 包含以下字段:
- name: 资源 ID,健康检查的报告对象。
- type: 健康检查类型,取值为
["http", "https", "tcp"]。 - nodes: 检查节点列表。在健康检查器注册检查目标之前该字段为空数组(
[]),健康检查器在上游第一次处理请求时才会创建。 - nodes[i].ip: IP 地址。
- nodes[i].port: 端口。
- nodes[i].status: 状态:
["healthy", "unhealthy", "mostly_healthy", "mostly_unhealthy"]。 - nodes[i].counter.success: 成功计数器。
- nodes[i].counter.http_failure: HTTP 访问失败计数器。
- nodes[i].counter.tcp_failure: TCP 连接或读写的失败计数器。
- nodes[i].counter.timeout_failure: 超时计数器。
插件也可以对不属于任何上游的节点进行主动健康检查。ai-proxy-multi 就是这样:它探测每个 LLM 实例,并在选择目标时跳过不健康的实例。这类检查器会额外带上两个字段:
{
  "name": "/apisix/routes/1#plugins['ai-proxy-multi'].instances[0]",
  "plugin": "ai-proxy-multi",
  "meta": {
    "instance": "openai"
  },
  "type": "http",
  "nodes": [
    {
      "ip": "52.86.68.46",
      "port": 443,
      "status": "healthy",
      "counter": {
        "http_failure": 0,
        "success": 2,
        "timeout_failure": 0,
        "tcp_failure": 0
      }
    }
  ]
}
- plugin: 拥有该健康检查器的插件名。上游自身的健康检查器没有该字段。
- meta: 由插件填写,用于描述该检查器代表什么,内容由插件自行定义;
ai-proxy-multi在其中报告实例名。
用户也可以通过 /v1/healthcheck/$src_type/$src_id 来获取指定 health checker 的状态。
例如,GET /v1/healthcheck/upstreams/1 返回:
{
  "nodes": [
    {
      "ip": "52.86.68.46",
      "counter": {
        "http_failure": 0,
        "success": 2,
        "timeout_failure": 0,
        "tcp_failure": 0
      },
      "port": 80,
      "status": "healthy"
    },
    {
      "ip": "100.24.156.8",
      "counter": {
        "http_failure": 5,
        "success": 0,
        "timeout_failure": 0,
        "tcp_failure": 0
      },
      "port": 80,
      "status": "unhealthy"
    }
  ],
  "type": "http"
  "name": "/apisix/routes/1"
}
note
上游只要配置了健康检查,就会出现在结果里面。在上游于任意一个 worker 进程处理过客户端请求之前,
健康检查器尚未创建,此时它的 nodes 为空数组。
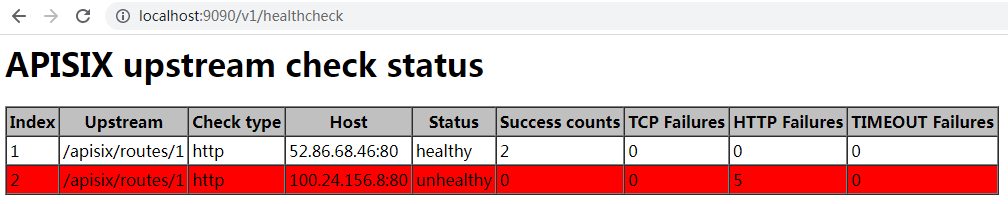
如果你使用浏览器访问该 API,你将得到一个网页:
GET /v1/healthcheck/{src_type}/{src_id}/checkers#
以数组形式返回某个资源拥有的全部健康检查器,数组元素与上文描述的 entry 结构一致。
一个资源可能拥有多个健康检查器——它自身的上游,加上每个插件实例各一个——而
GET /v1/healthcheck/$src_type/$src_id 返回的是单个对象,无法表达这种情况。
例如,GET /v1/healthcheck/routes/1/checkers 返回:
[
  {
    "name": "/apisix/routes/1",
    "type": "http",
    "nodes": [...]
  },
  {
    "name": "/apisix/routes/1#plugins['ai-proxy-multi'].instances[0]",
    "plugin": "ai-proxy-multi",
    "meta": {
      "instance": "openai"
    },
    "type": "http",
    "nodes": [...]
  }
]
资源没有配置任何健康检查在这里不算错误:它拥有一个空的检查器集合,接口返回 []。
只有资源本身不存在时才返回 404。
POST /v1/gc#
引入自 2.8 版本
在 http 子系统中触发一次全量 GC
注意,当你启用 stream proxy 时,APISIX 将为 stream 子系统运行另一个 Lua 虚拟机。它不会触发这个 Lua 虚拟机中的全量 GC。
GET /v1/plugin_metadatas#
引入自 3.0.0 版本
打印所有插件的元数据:
[
    {
        "log_format": {
            "upstream_response_time": "$upstream_response_time"
        },
        "id": "file-logger"
    },
    {
        "ikey": 1,
        "skey": "val",
        "id": "example-plugin"
    }
]
GET /v1/plugin_metadata/{plugin_name}#
引入自 3.0.0 版本
打印指定插件的元数据:
{
    "log_format": {
        "upstream_response_time": "$upstream_response_time"
    },
    "id": "file-logger"
}