
This article takes configuring HTTPS communication between the downstream client and APISIX as an example to introduce how APISIX integrates Vault to implement SSL certificate management.
API gateway is a key basic component in API lifecycle management. It is the entrance of all traffic and is responsible for routing API requests from downstream clients to the correct upstream service for processing. Therefore, the API gateway works for the network communication between the upstream services and the downstream clients.
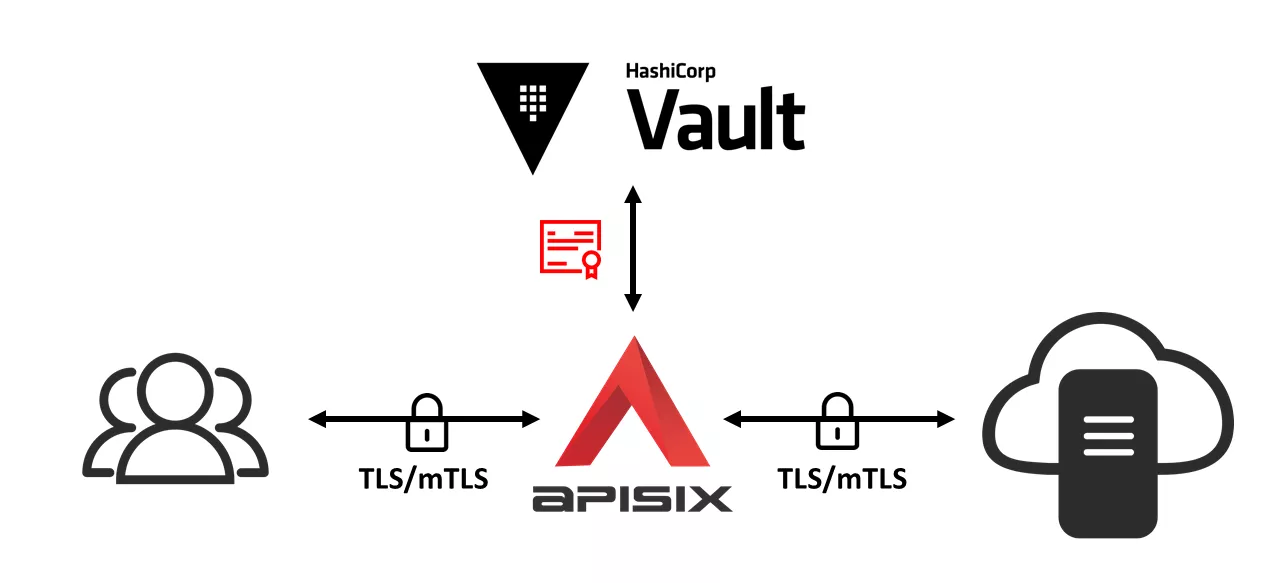
As a new cloud-native API gateway, Apache APISIX provides the TLS/mTLS communication mechanism between the downstream clients and APISIX, and that between APISIX and upstream services, so as to ensure the network security between them. APISIX saves the SSL certificate as an SSL certificate object, and realizes the dynamic loading of the SSL certificate through the extension SNI (Server Name Indication) that supports the TLS protocol.
In order to securely store the SSL certificates in APISIX, APISIX has achieved integration with HashiCorp Vault, thus realizing the unified management of SSL certificates by taking advantage of Vault's secret security storage. This article takes configuring HTTPS communication between the downstream client and APISIX as an example to introduce how APISIX integrates Vault to implement SSL certificate management.

What Is SSL Certificate
SSL/TLS is a cryptographic protocol that protects the security of network communication by establishing an encrypted network connection between the two communicating parties. The SSL/TLS protocol ensures that data is sent to the correct client and server by authenticating users and servers. In addition, the SSL/TLS protocol can encrypt communication data, thereby ensuring that data cannot be stolen, tampered with or forged during transmission.
An SSL certificate is a digital certificate that authenticates a website's identity and enables an encrypted connection using the SSL/TLS protocol. An SSL certificate is usually issued by a trusted digital certificate authority (CA), which mainly includes the following information:
- Domain name
- Certificate authority
- Digital signature signed by the certificate authority
- Associated subdomains
- Issue date of certificates
- Expiration date of certificates
- The public key (while the private key is a secret key)
What Is HashiCorp Vault
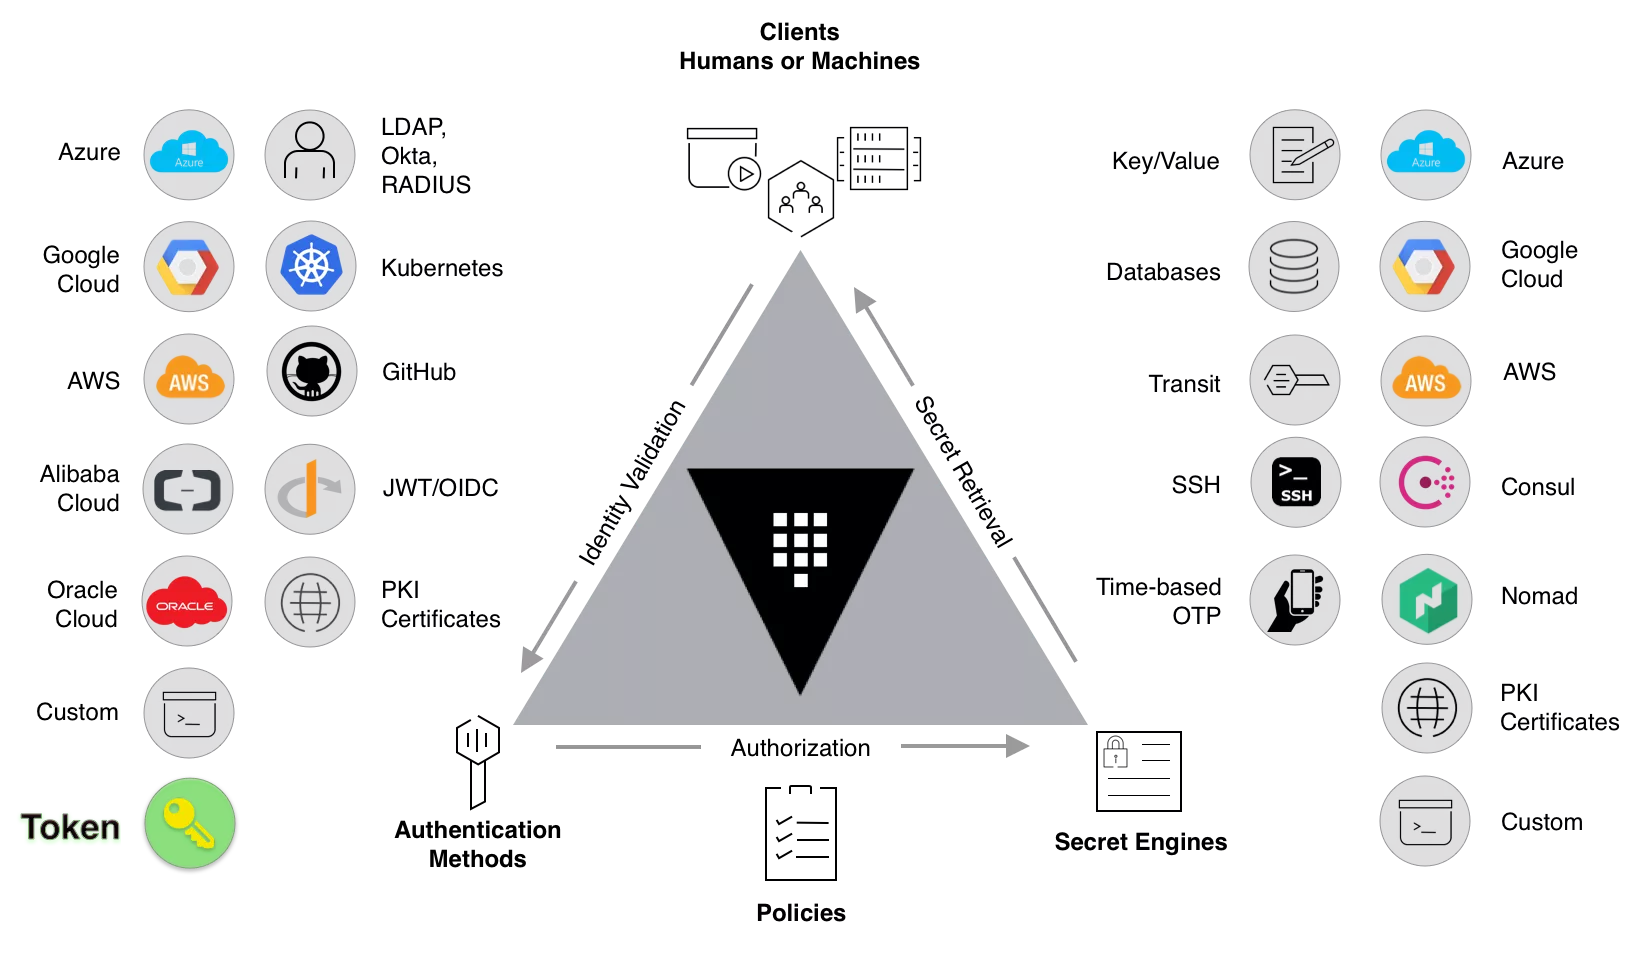
HashiCorp Vault (hereinafter referred to as Vault) is an enterprise-level Secret management tool that can store and manage sensitive data such as tokens, passwords, and certificates. Vault can be integrated with technologies in the entire IT system, provide identity-based security automation and encryption services, centrally control access to sensitive data and systems, and help organizations reduce the risk of data leakage and data exposure, thereby improving cloud and application security.

How to Store APISIX SSL Certificates in Vault
Environment Preparation
- Install Docker
- Install cURL
- A running APISIX service, or follow Getting Started tutorial to deploy an APISIX Docker container
Deploy and Configure Vault Service
In this section, we will use Docker to deploy a Vault container service. You can skip this section if you already have a Vault service instance available in your environment.
Create and deploy a Vault container in Dev mode, named apisix-quickstart-vault. Specify the Vault Token as apisix-quickstart-vault-token and map port 8200 to the host:
docker run -d --cap-add=IPC_LOCK \
  -e 'VAULT_DEV_LISTEN_ADDRESS=0.0.0.0:8200' \
  -e 'VAULT_ADDR=http://0.0.0.0:8200' \
  -e 'VAULT_DEV_ROOT_TOKEN_ID=apisix-quickstart-vault-token' \
  -e 'VAULT_TOKEN=apisix-quickstart-vault-token' \
  --network=apisix-quickstart-net \
  --name apisix-quickstart-vault \
  -p 8200:8200 vault:1.13.0
Select kv as the APISIX SSL certificate storage path:
docker exec apisix-quickstart-vault vault secrets enable -path=kv -version=1 kv
Configure APISIX
APISIX needs to read SSL certificates from Vault, so Vault should grant read permission to APISIX on the specified path.
Create a Vault policy named apisix-policy.hcl, granting APISIX read access to the path kv/apisix/:
docker exec apisix-quickstart-vault /bin/sh -c "echo '
path \"kv/apisix/*\" {
    capabilities = [\"read\"]
}
' > /etc/apisix-policy.hcl"
Apply the created policy file apisix-policy.hcl to Vault:
docker exec apisix-quickstart-vault vault policy write apisix-policy /etc/apisix-policy.hcl
Create an APISIX secret object with the id quickstart-secret-id to save the Vault connection information and certificate storage path:
curl -i "http://127.0.0.1:9180/apisix/admin/secrets/vault/quickstart-secret-id" -X PUT -d '
{
    "uri": "http://apisix-quickstart-vault:8200",
    "prefix": "kv/apisix",
    "token" : "apisix-quickstart-vault-token"
}'
Store SSL Certificates in Vault
Create a self-signed CA certificate ca.crt and key ca.key:
openssl genrsa -out ca.key 2048 && \
  openssl req -new -sha256 -key ca.key -out ca.csr -subj "/CN=ROOTCA" && \
  openssl x509 -req -days 36500 -sha256 -extensions v3_ca -signkey ca.key -in ca.csr -out ca.crt
The SSL certificate server.crt and the key server.key are issued by the CA, and its common name (CN) is test.com:
openssl genrsa -out server.key 2048 && \
  openssl req -new -sha256 -key server.key -out server.csr -subj "/CN=test.com" && \
  openssl x509 -req -days 36500 -sha256 -extensions v3_req \
  -CA ca.crt -CAkey ca.key -CAserial ca.srl -CAcreateserial \
  -in server.csr -out server.crt
Copy the issued SSL certificate and key to the Vault container:
docker cp server.key apisix-quickstart-vault:/root/
docker cp server.crt apisix-quickstart-vault:/root/
Use the vault kv put command to store the SSL certificate and key as a secret, the key is ssl, and the storage path is kv/apisix:
docker exec apisix-quickstart-vault vault kv put kv/apisix/ssl test.com.crt=@/root/server.crt test.com.key=@/root/server.key
Through the above command, we have stored a secret named ssl in Vault, which contains 2 key-value pairs: certificate and private key.
How to Use APISIX SSL Certificate Stored in Vault
APISIX supports TLS/mTLS network encryption between downstream clients and APISIX, and between APISIX and upstream services, where the SSL certificates stored in Vault can be used. We will take configuring HTTPS communication between the client and APISIX as an example to demonstrate how to use the SSL certificate stored in Vault in APISIX.
Configure HTTPS Communication Between Client and APISIX
Create an SSL certificate object to hold the SSL certificate:
curl -i "http://127.0.0.1:9180/apisix/admin/ssls" -X PUT -d '
{
  "id": "quickstart-tls-client-ssl",
  "sni": "test.com",
  "cert": "$secret://vault/quickstart-secret-id/ssl/test.com.crt",
  "key": "$secret://vault/quickstart-secret-id/ssl/test.com.key"
}'
The sni of this object is test.com, which is consistent with the CN that issued the certificate. The cert and key correspond to the issued certificate and private key, which are automatically obtained from the Vault through the established secret resource locator, and the resource locator rules are:
$secret://$manager/$id/$secret_name/$key
- manager: key management service Vault
- id: APISIX secret resource ID
- secret_name: the secret name in Vault
- key: the key of the key-value pair in the secret named secret_name
Verify HTTPS Communication Between Client and APISIX
Create a route to forward all requests sent to /ip to upstream httpbin.org:
curl -i "http://127.0.0.1:9180/apisix/admin/routes" -X PUT -d '
{
  "id": "quickstart-client-ip",
  "uri": "/ip",
  "upstream": {
    "nodes": {
      "httpbin.org:80":1
    },
    "type": "roundrobin"
  }
}'
Use cURL to send a request to https://test.com:9443/ip, test.com resolves to 127.0.0.1:
curl -ikv --resolve "test.com:9443:127.0.0.1" "https://test.com:9443/ip"
If the configuration is successful, the client and APISIX TLS handshake process returned by cURL will be the same as the following results:
* Added test.com:9443:127.0.0.1 to DNS cache
* Hostname test.com was found in DNS cache
*   Trying 127.0.0.1:9443...
* Connected to test.com (127.0.0.1) port 9443 (#0)
* ALPN, offering h2
* ALPN, offering http/1.1
* successfully set certificate verify locations:
*  CAfile: /etc/ssl/certs/ca-certificates.crt
*  CApath: /etc/ssl/certs
* TLSv1.3 (OUT), TLS handshake, Client hello (1):
* TLSv1.3 (IN), TLS handshake, Server hello (2):
* TLSv1.3 (IN), TLS handshake, Encrypted Extensions (8):
* TLSv1.3 (IN), TLS handshake, Certificate (11):
* TLSv1.3 (IN), TLS handshake, CERT verify (15):
* TLSv1.3 (IN), TLS handshake, Finished (20):
* TLSv1.3 (OUT), TLS change cipher, Change cipher spec (1):
* TLSv1.3 (OUT), TLS handshake, Finished (20):
* SSL connection using TLSv1.3 / TLS_AES_256_GCM_SHA384
* ALPN, server accepted to use h2
* Server certificate:
*  subject: CN=test.com
*  start date: Apr 21 07:47:54 2023 GMT
*  expire date: Mar 28 07:47:54 2123 GMT
*  issuer: CN=ROOTCA
*  SSL certificate verify result: unable to get local issuer certificate (20), continuing anyway.
* Using HTTP2, server supports multi-use
* Connection state changed (HTTP/2 confirmed)
* Copying HTTP/2 data in stream buffer to connection buffer after upgrade: len=0
* Using Stream ID: 1 (easy handle 0x556274d632e0)
> GET /ip HTTP/2
> Host: test.com:9443
> user-agent: curl/7.74.0
> accept: */*
>
* TLSv1.3 (IN), TLS handshake, Newsession Ticket (4):
* TLSv1.3 (IN), TLS handshake, Newsession Ticket (4):
* old SSL session ID is stale, removing
* Connection state changed (MAX_CONCURRENT_STREAMS == 128)!
< HTTP/2 200
HTTP/2 200
...
Summary
We introduced how APISIX integrates Vault to implement SSL certificate management and showed the configuration and integration steps in detail taking HTTPS communication between downstream clients and APISIX as an example.